

Example: Building a Java GUI
Steven Zeil
The StringArt Program
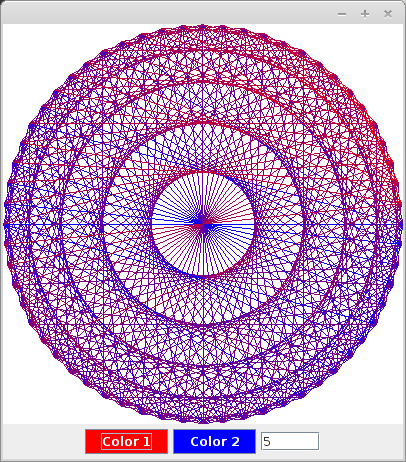
To illustrate Java event handling, we’ll look at a simple, but typical GUI interface to a graphic application
-
StringArt.java
- Compiled version of this program.
1 Build 1: The “manual” build
We’ll actually build this program twice. First, we’ll do it “manually” as a step-by-step process using ordinary Java editing tools. Then we’ll do a second “assisted” build using WindowBuilder, a GUI design tool that comes with Eclipse.
First, a reminder of the process that we need to follow:
The Process
- Develop the model
- Select the GUI elements to portray the model
- Develop the layout of those elements
- Add listeners to the elements
- Implement custom drawing
1.1 Develop the Model
The model is the underlying data that is being manipulated and portrayed by the program.
- In this example, we need enough info to arrange the “strings” of various colors at appropriate steps around the circle.
// The Model
  private Color[] colors;
  private int stepSize = 5;
- The array will hold two colors.
Select the GUI elements to portray the model
-
The core elements we will need:
- a “canvas” on which to draw the graphics
- This is generally done with a JPanel
- A text entry box (JTextField) in which to enter the step size
- Two buttons (JButton) to activate the color choices
- a “canvas” on which to draw the graphics
-
How do we choose these?
- It helps to know what’s available.
1.2 Develop the layout of those elements
There are two common approaches to laying out GUIs
-
Manual arrangement using a program similar to a graphics editor (Visio, Dia, etc.) but with GUI elements as the building blocks
- Easy & quick
- Resulting layouts are often inflexible
- Respond badly to window’s being resized
- Or to being displayed on smaller screens, different operating systems, window managers, etc.
-
Programmed arrangement
- Takes more effort
- Though not much more given the need to program behaviors of the elements
- Code can implement policies for resizing
- Takes more effort
Programmed Approach in Java
Uses a combination of
-
Container/nesting relationships
-
Layout managers
GUI Container Elements
- Some GUI elements are containers that hold other elements
- The size and position of the container constrains the possible positions of the elements within it
- Internal positioning is controlled by a layout manager.
GUI Elements in StringArt
-
The outermost container is a window (JFrame)
- This is a container.
- Specifically, it contains a “content pane”
- We add elements to the content pane
-
The window’s content pane will contain
- Our drawing canvas (JPanel) and, beneath that,
- A control panel (JPanel)
-
The control panel will contain
- The two buttons for choosing colors
- the test extry box for the step size
Structural Summary

Where Did the Control Panel Come From?
-
Java has a handful of rules for easily arranging elements
- horizontal rows
- vertical columns
- grids
- arranged around a center, etc.
-
It’s easiest to break a desired arrangement down into a combination of these
- e.g., horizontal row within the control panel, and vertical within the window
Programming the Containment
GUI container elements are handled much like utility containers
  public void createAndShowGUI() {
      window = new JFrame();       ➀
         //...
      canvas = new JPanel () {     ➁
	      //...
          }
      };
    canvas.setBackground(Color.white);
    window.getContentPane().add (canvas, BorderLayout.CENTER);  ➂
    canvas.setPreferredSize(new Dimension(400, 400));

    JPanel controls = new JPanel();                             ➃

    colorChooser1 = new JButton("Color 1");                     ➄
    controls.add (colorChooser1);
      //...
    colorChooser2 = new JButton("Color 2");
    controls.add (colorChooser2);
      //...
    stepSizeIn = new JTextField (""+stepSize, 5);
    controls.add (stepSizeIn);
      //...
    window.getContentPane().add (controls, BorderLayout.SOUTH);  ➅
      //...
    window.pack();                                               ➆
    window.setVisible(true);
  }
-
➀ Create the window
-
➁ Create the canvas
-
➂ Add the canvas to the window’s content pane
-
➃ Create the control panel
-
➄ Create the buttons and text field and add to the control panel
-
➅ Add the control panel to the window’s content pane
-
➆ Arrange the components of the GUI and display the window.
Laying out the components
Java has several layout managers.
-
These give us several options for how to arrange our components
-
Need to choose one for each container
-
For the control panel, we want a horizontal row
- FlowLayout, BoxLayout, or BorderLayout would work
- FlowLayout is already the default for JPanels, so it’s easiest to stick with that
-
For the window’s content pane, we want a vertical row
- BoxLayout or BorderLayout would work
- I chose BorderLayout
Using Border Layout
  public void createAndShowGUI() {
      window = new JFrame();
      // set up the components
      window.getContentPane().setLayout (
            new BorderLayout());

      canvas = new JPanel () {
          ⋮
          }
      };
      ⋮
    window.getContentPane().add (canvas,
             BorderLayout.CENTER);

    JPanel controls = new JPanel();
      ⋮
    window.getContentPane().add (controls,
              BorderLayout.SOUTH);
      ⋮
Miscellaneous Appearance Code
  public void createAndShowGUI() {
      window = new JFrame();
      // set up the components
      window.getContentPane().setLayout (new BorderLayout());

      canvas = new JPanel () {
	      //...
          }
      };
    canvas.setBackground(Color.white);
    window.getContentPane().add (canvas, BorderLayout.CENTER);
canvas.setPreferredSize(new Dimension(400, 400));  ➀

    JPanel controls = new JPanel();

    colorChooser1 = new JButton("Color 1");
    controls.add (colorChooser1);
    setColor(colorChooser1, colors[0]);
    colorChooser1.addActionListener (new ColorChooser(colorChooser1, 0));

    colorChooser2 = new JButton("Color 2");
    controls.add (colorChooser2);
    setColor(colorChooser2, colors[1]);
    colorChooser2.addActionListener (new ColorChooser(colorChooser2, 1));

    stepSizeIn = new JTextField (""+stepSize, 5);
    controls.add (stepSizeIn);
    stepSizeIn.addActionListener (new ActionListener()
      {
        public void actionPerformed(ActionEvent e) {
          try {
            Integer newSize = new Integer(stepSizeIn.getText());
            stepSize = newSize.intValue();
            canvas.repaint();
          } catch (Exception ex) {};
        }
      });

    window.getContentPane().add (controls, BorderLayout.SOUTH);

    window.setDefaultCloseOperation((startedInAnApplet) ? JFrame.DISPOSE_ON_CLOSE : JFrame.EXIT_ON_CLOSE);

    window.pack();
    window.setVisible(true);
  }

  /**
   * Sets the background color of a button to the indicated color.
   * Changes the foreground to wither black or white, depending on
   * which will give more contrast agasint the new background.
   *
   * @param button
   * @param color
   */
  private void setColor(JButton button, Color color) {   ➁
    button.setBackground(color);
    int brightness = color.getRed() + color.getGreen() + color.getBlue(); // max of 3*255
    if (brightness > 3*255/2) {
        // This is a fairly bright color. Use black lettering
        button.setForeground (Color.black);
    } else {
        // This is a fairly dark color. Use white lettering
        button.setForeground (Color.white);
    }
}
Most of the highlighted code is self-explanatory
-
➀ The canvas, a panel with no internal components, has no “natural” size and tends to shrink to \( 0\times 0 \) if we aren’t careful
-
➁ This utility function sets the background color of a button to match the color that it selects, and makes sure that the foreground color of the text is visible in contrast.
1.3 Add listeners to the elements
We need to implement some behaviors
-
Closing the window shuts down the program
-
Entering a number in the text box changes the step size in the model
-
Clicking a color button pops up a color selection dialog and updates the model
Closing the Window
Here we use a shorthand technqiue rather than create a full-fledged functor to listen:
public void createAndShowGUI() {
    window = new JFrame();
       ⋮
  window.setDefaultCloseOperation(
    (startedInAnApplet)
        ? JFrame.DISPOSE_ON_CLOSE
        : JFrame.EXIT_ON_CLOSE);
       ⋮
}
Entering the Step Size
This is handled by an ActionListener, which is triggered when we hit Enter/Return with the cursor positioned in the text box.
 stepSizeIn = new JTextField (""+stepSize, 5);
 controls.add (stepSizeIn);
 stepSizeIn.addActionListener (new ActionListener()
   {
     public void actionPerformed(ActionEvent e) {
       try {
         Integer newSize = new Integer(
                       stepSizeIn.getText());
         stepSize = newSize.intValue();
            ⋮
       } catch (Exception ex) {};
     }
   });
Color Selection
Buttons notify an ActionListener when a button is clicked
    colorChooser1 = new JButton("Color 1");
    controls.add (colorChooser1);
    setColor(colorChooser1, colors[0]);
    colorChooser1.addActionListener (
        new ColorChooser(colorChooser1, 0));

    colorChooser2 = new JButton("Color 2");
    controls.add (colorChooser2);
    setColor(colorChooser2, colors[1]);
    colorChooser2.addActionListener (
        new ColorChooser(colorChooser2, 1));
We implement this with our own subclass of ActionListener, ColorChooser.
ColorChooser
  private class ColorChooser implements ActionListener {
      private JButton button;          ➀
      private int colorNum;

      public ColorChooser (JButton button, int colorNum) {
          this.button = button;        ➁
          this.colorNum = colorNum;
      }

      @Override
      public void actionPerformed(ActionEvent arg0) {   ➂
          Color chosen = JColorChooser.showDialog(window, "Choose a color",
                  colors[colorNum]);
          if (chosen != null) {
              colors[colorNum] = chosen;   ➃
              setColor (button, chosen);
              canvas.repaint();
          }
      }
  };
-
➀ Each ColorChooser object will remember which button it is attached to and which of the two colors it controls.
-
➁ That info is gathered and remembered in the constructor.
-
➂ Here is the function that we must provide if we are to implement ActionListener
The JColorChooser invoked in the first line pops up the stnadard Java color selection box.
- ➃ Once we have a selected color, we update the appropriate element of the model’s colors array, and also change the button’s coloring.
1.4 Implement custom drawing
The proper moment for drawing GUI elements is a bit tricky.
Think of some of the various situations in which all or part of a window needs to be redrawn:
-
The program concludes some kind of computation and needs to display the results (i.e., a program state change).
-
We had previously clicked on the minimize/iconify control to reduce the window to an icon, and now we click on the icon to open it back up to a full window.
-
The window was completely or partially hidden beneath other windows and we
Alt-tabto bring it back up to the top. -
We drag another window or other item across the front of window, continuously hiding and revealing different potions of the window as we do so.
Any of these can force part or all of an application to need redrawing. Some of these (state changes) are under direct program control. Most are not.
paint and repaint
-
Most GUI elements already take care of drawing themselves.
-
For elements with customized appearance:
-
Programmer provides a
paintfunction.
-
    canvas = new JPanel () {
        public void paint (Graphics g) {
          super.paint(g);
          drawLines (g, getSize());
        }
      };
Paint and Repaint
-
We never call
paintdirectly -
We call
repaint()- That asks the system to schedule a call to
paintfor sometime in the near future.
- That asks the system to schedule a call to
Repainting the StringArt Canvas
  private class ColorChooser implements ActionListener {
      private JButton button;
      private int colorNum;

      public ColorChooser (JButton button, int colorNum) {
          this.button = button;
          this.colorNum = colorNum;
      }

      @Override
      public void actionPerformed(ActionEvent arg0) {
          Color chosen = JColorChooser.showDialog(window, "Choose a color", colors[colorNum]);
          if (chosen != null) {
              colors[colorNum] = chosen;
              setColor (button, chosen);
              canvas.repaint();
          }
      }
  };


  public void createAndShowGUI() {
      window = new JFrame();
      // set up the components
      window.getContentPane().setLayout (new BorderLayout());

      canvas = new JPanel () {
          public void paint (Graphics g) {
              super.paint(g);
              drawLines (g, getSize());
          }
      };
    canvas.setBackground(Color.white);
    window.getContentPane().add (canvas, BorderLayout.CENTER);
    canvas.setPreferredSize(new Dimension(400, 400));

    JPanel controls = new JPanel();

    colorChooser1 = new JButton("Color 1");
    controls.add (colorChooser1);
    setColor(colorChooser1, colors[0]);
    colorChooser1.addActionListener (new ColorChooser(colorChooser1, 0));

    colorChooser2 = new JButton("Color 2");
    controls.add (colorChooser2);
    setColor(colorChooser2, colors[1]);
    colorChooser2.addActionListener (new ColorChooser(colorChooser2, 1));

    stepSizeIn = new JTextField (""+stepSize, 5);
    controls.add (stepSizeIn);
    stepSizeIn.addActionListener (new ActionListener()
      {
        public void actionPerformed(ActionEvent e) {
          try {
            Integer newSize = new Integer(stepSizeIn.getText());
            stepSize = newSize.intValue();
            canvas.repaint();
          } catch (Exception ex) {};
        }
      });

    window.getContentPane().add (controls, BorderLayout.SOUTH);

    window.setDefaultCloseOperation((startedInAnApplet) ? JFrame.DISPOSE_ON_CLOSE : JFrame.EXIT_ON_CLOSE);

    window.pack();
    window.setVisible(true);
  }
- We request a repaint of the canvas after any operation that could change its appearance.
The Full Listing
import java.awt.BorderLayout;
import java.awt.Color;
import java.awt.Dimension;
import java.awt.Graphics;
import java.awt.event.ActionEvent;
import java.awt.event.ActionListener;
import java.awt.event.ItemEvent;
import java.awt.event.ItemListener;

import javax.swing.JApplet;
import javax.swing.JButton;
import javax.swing.JColorChooser;
import javax.swing.JComboBox;
import javax.swing.JFrame;
import javax.swing.JPanel;
import javax.swing.JTextField;

/**
 * A simple example of GUI event handling in a Java application.
 *
 * This can be run as a main program or as an applet.
 *
 * @author zeil
 *
 */


public class StringArt extends JApplet {

  private boolean startedInAnApplet;

// The Model
  private Color[] colors;
  private int stepSize = 5;

  // The View & Controls
  private JFrame window;
  private JPanel canvas;
  private JButton colorChooser1;
  private JButton colorChooser2;
  private JTextField stepSizeIn;


  private class ColorChooser implements ActionListener {
      private JButton button;
      private int colorNum;

      public ColorChooser (JButton button, int colorNum) {
          this.button = button;
          this.colorNum = colorNum;
      }

      @Override
      public void actionPerformed(ActionEvent arg0) {
          Color chosen = JColorChooser.showDialog(window, "Choose a color", colors[colorNum]);
          if (chosen != null) {
              colors[colorNum] = chosen;
              setColor (button, chosen);
              canvas.repaint();
          }
      }
  };

  public StringArt()
  {
      startedInAnApplet = false;
      window = null;
      colors = new Color[2];
      colors[0] = Color.red;
      colors[1] = Color.blue;
  }


  public static void main (String[] args)
  {
      StringArt instance = new StringArt();
      instance.createAndShowGUI();
  }

  public void createAndShowGUI() {
      window = new JFrame();
      // set up the components
      window.getContentPane().setLayout (new BorderLayout());

      canvas = new JPanel () {
          public void paint (Graphics g) {
              super.paint(g);
              drawLines (g, getSize());
          }
      };
    canvas.setBackground(Color.white);
    window.getContentPane().add (canvas, BorderLayout.CENTER);
    canvas.setPreferredSize(new Dimension(400, 400));

    JPanel controls = new JPanel();

    colorChooser1 = new JButton("Color 1");
    controls.add (colorChooser1);
    setColor(colorChooser1, colors[0]);
    colorChooser1.addActionListener (new ColorChooser(colorChooser1, 0));

    colorChooser2 = new JButton("Color 2");
    controls.add (colorChooser2);
    setColor(colorChooser2, colors[1]);
    colorChooser2.addActionListener (new ColorChooser(colorChooser2, 1));

    stepSizeIn = new JTextField (""+stepSize, 5);
    controls.add (stepSizeIn);
    stepSizeIn.addActionListener (new ActionListener()
      {
        public void actionPerformed(ActionEvent e) {
          try {
            Integer newSize = new Integer(stepSizeIn.getText());
            stepSize = newSize.intValue();
            canvas.repaint();
          } catch (Exception ex) {};
        }
      });

    window.getContentPane().add (controls, BorderLayout.SOUTH);

    window.setDefaultCloseOperation((startedInAnApplet) ? JFrame.DISPOSE_ON_CLOSE : JFrame.EXIT_ON_CLOSE);

    window.pack();
    window.setVisible(true);
  }

  /**
   * Sets the background color of a button to the indicated color.
   * Changes the foreground to wither black or white, depending on
   * which will give more contrast agasint the new background.
   *
   * @param button
   * @param color
   */
  private void setColor(JButton button, Color color) {
    button.setBackground(color);
    int brightness = color.getRed() + color.getGreen() + color.getBlue(); // max of 3*255
    if (brightness > 3*255/2) {
        // This is a fairly bright color. Use black lettering
        button.setForeground (Color.black);
    } else {
        // This is a fairly dark color. Use white lettering
        button.setForeground (Color.white);
    }
}

  // Applet functions

  public void init() {
      startedInAnApplet = true;
  }

public void start() {
    if (window == null)
        createAndShowGUI();
  }

  public void stop() {
  }

  public void destroy() {
  }


  int interpolate (int x, int y, int i, int steps)
  {
    return (i * x + (steps-i)*y) / steps;
  }


  Color interpolate(Color c1, Color c2, int i, int steps)
  {
    return new Color (interpolate(c1.getRed(), c2.getRed(), i, steps),
                      interpolate(c1.getGreen(), c2.getGreen(), i, steps),
                      interpolate(c1.getBlue(), c2.getBlue(), i, steps));
  }


  class Point {
    double x;
    double y;
  }

  Point ptOnCircle (int degrees, int radius, Point center)
  {
    Point p = new Point();
    double theta = Math.toRadians((double)degrees);
    p.x = center.x + (double)radius * Math.cos(theta);
    p.y = center.y + (double)radius * Math.sin(theta);
    return p;
  }

  public void drawLines(Graphics g, Dimension d)
  {
    int dmin = (d.width < d.height) ? d.width : d.height;

    if (stepSize < 1)
      stepSize = 1;

    Point center = new Point();
    center.x = (double)d.width/2.0;
    center.y = (double)d.height/2.0;

    for (int i = 0; i < 60; ++i) {
      Point origin = ptOnCircle(6*i, dmin/2, center);
      int j = i + stepSize;
      while (j >= 60)
        j -= 60;
      while (i != j) {
        Point destination = ptOnCircle(6*j, dmin/2, center);
        g.setColor(interpolate(interpolate(colors[0], colors[1], i%30, 30),
                               interpolate(colors[0], colors[1], j, 60),
                               1, 2));
        g.drawLine ((int)origin.x, (int)origin.y,
                    (int)destination.x, (int)destination.y);
        j += stepSize;
        while (j >= 60)
          j -= 60;
      }
    }
  }


}
2 Build 2: An “assisted” build with WindowBuilder
WindowBuilder is a GUI construction tool that is included in the more recent Java-based versions of Eclipse and can be added as an option to older versions.
WindowBuilder lets you position your GUI elements visually and generates the corresponding source code. It can sometimes be applied to existing GUI code as well, depending upon how complicated the code is.
WindowBuilder is not a replacement for understanding how the GUI elements work in Java, or for understanding the logic of layout managers. It provides only limited help for implementing behaviors – it can insert code skeletons in the appropriate place but you still need to fill those in with the implementation of the behaviors that you need.
Let’s look at how we could have used WindowBuilder to streamline the construction of the same string art program.
2.1 Setting Up the Model
We still start with the idea of a model containing the basic data about what we are drawing and interacting with. For this build, i will break the model out into a separate class, StringArtModel, shown here:
import java.awt.Color;
import java.awt.Dimension;
import java.awt.Graphics;

import javax.swing.JButton;

/**
 * The core data and drawing algorithm for the CS330 string art program.
 *
 * @author zeil
 *
 */
public class StringArtModel {

	/**
	 * The two colors used in drawing the picture.
	 * Lines are shaded gradually from colors[0]
	 * to colors[1].
	 */
    private Color[] colors;

	/**
	 * Each of the 60 points around the circle will get
	 * a line connecting it to the points k*stepSize away,
	 * for all values of k (until we start to repeat
	 * the same lines).
	 */
	private int stepSize = 5;    ➁


	/**
	 * Create a new set of model data.
	 */
	public StringArtModel() {
		colors = new Color[2];
		colors[0] = Color.red;
		colors[1] = Color.blue;
	}

	/**
	 * Get the value of one of the colors.
	 * @param colorNum an integer in the range 0..1
	 * @return the requested color.
	 */
    public Color getColor(int colorNum) {     ➂
		return colors[colorNum];
	}

	/**
	 * Change the value of one of the colors.
	 * @param colorNum an integer in the range 0..1
	 * @param color the desired color
	 */
	public void setColor(int colorNum, Color color) {  ➂
		colors[colorNum] = color;
	}

	/**
	 * Get the current step size.  When drawLines is called,
	 * each of the 60 points around the circle will get
	 * a line connecting it to the points k*getStepSize() away,
	 * for all values of k (until we start to repeat
	 * the same lines).
	 *
	 * @return the step size
	 */
	public int getStepSize() {     ➂
		return stepSize;
	}

	/**
	 * Change the step size value.
	 * @param newStepSize the desired step size
	 */
	public void setStepSize (int newStepSize) {    ➂
		stepSize = newStepSize;
	}


	/**
	 * Compute the value that lies (i/n) of the way between x and y.
	 *
	 * @param x any integer value
	 * @param y any integer value
	 * @param i an integer in the range 0..steps indicating how close to y we want to be
	 * @param steps how many steps from x to y
	 * @return an interpolated value between x and y
	 */
	private int interpolate (int x, int y, int i, int steps) {
		return (i * x + (steps-i)*y) / steps;
	}

	/**
	 * Compute a color that lies between c1 and c2.  This is the function
	 * used  to "shade" lines between the two base colors.
	 *
	 * @param c1 any color
	 * @param c2 any colot
	 * @param i an integer in the range 0..steps indicating how close to c2 we want to be
	 * @param steps how many steps from c1 to c2
	 * @return an interpolated value between c1 and c2
	 * @return an interpolated color value.
	 */

	private Color interpolate(Color c1, Color c2, int i, int steps) {
		return new Color (interpolate(c1.getRed(), c2.getRed(), i, steps),
				interpolate(c1.getGreen(), c2.getGreen(), i, steps),
				interpolate(c1.getBlue(), c2.getBlue(), i, steps));
	}


	/**
	 * An (x,y) Cartesian coordinate.
	 * @author zeil
	 *
	 */
	private class Point {
		public double x;
		public double y;
	}

	/**
	 * Get the coordinates of a point on a circle.
	 * @param degrees The angle around the circle where we want the point.
	 * @param radius  The radius of the circle.
	 * @param center  The center of the circle.
	 * @return  the coordinates of a point on the edge of the circle at the desired angle.
	 */
	private Point ptOnCircle (int degrees, int radius, Point center) {
		Point p = new Point();
		double theta = Math.toRadians((double)degrees);
		p.x = center.x + (double)radius * Math.cos(theta);
		p.y = center.y + (double)radius * Math.sin(theta);
		return p;
	}

	/**
	 * Draw a series of lines connecting 60 points set around
	 * a circle.
	 *
	 * @param g the graphics device on which we are to drawn.
	 * @param d the dimension (width and height) of the available
	 *          drawing area.
	 */
    public void drawLines(Graphics g, Dimension d) {    ➃
		int dmin = (d.width < d.height) ? d.width : d.height;

		if (stepSize < 1)
			stepSize = 1;

		Point center = new Point();
		center.x = (double)d.width/2.0;
		center.y = (double)d.height/2.0;

		for (int i = 0; i < 60; ++i) {
			Point origin = ptOnCircle(6*i, dmin/2, center);
			int j = i + stepSize;
			while (j >= 60)
				j -= 60;
			while (i != j) {
				Point destination = ptOnCircle(6*j, dmin/2, center);
				g.setColor(interpolate(interpolate(colors[0], colors[1], i%30, 30),
						interpolate(colors[0], colors[1], j, 60),
						1, 2));
				g.drawLine ((int)origin.x, (int)origin.y,
						(int)destination.x, (int)destination.y);
				j += stepSize;
				while (j >= 60)
					j -= 60;
			}
		}
	}


	/**
	   * Sets the background color of a button to the indicated color.
	   * Changes the foreground to either black or white, depending on
	   * which will give more contrast against the new background.
	   *
	   * @param button
	   * @param color
	   */
	  public void setColor(JButton button, Color color) {  ➄
	    button.setBackground(color);
	    int brightness = color.getRed() + color.getGreen() + color.getBlue(); // max of 3*255
	    if (brightness > 3*255/2) {
	        // This is a fairly bright color. Use black lettering
	        button.setForeground (Color.black);
	    } else {
	        // This is a fairly dark color. Use white lettering
	        button.setForeground (Color.white);
	    }
	}
}
-
As before, the primary data consists of a pair of colors ➀ , and a step size ➁ .
In accordance with our usual ADT practices, though, I have made these private data members and added public
get… andset… functions ➂ to provide access to these attributes. -
This class also provides the
drawLinesfunction ➃ from our former code, together with the various functions that it depends upon. -
I have also kept the function that sets the background color of buttons ➄ , changing the text from black to white and back as necessary to keep it visible against the changing background.
2.2 Develop the layout of the elements
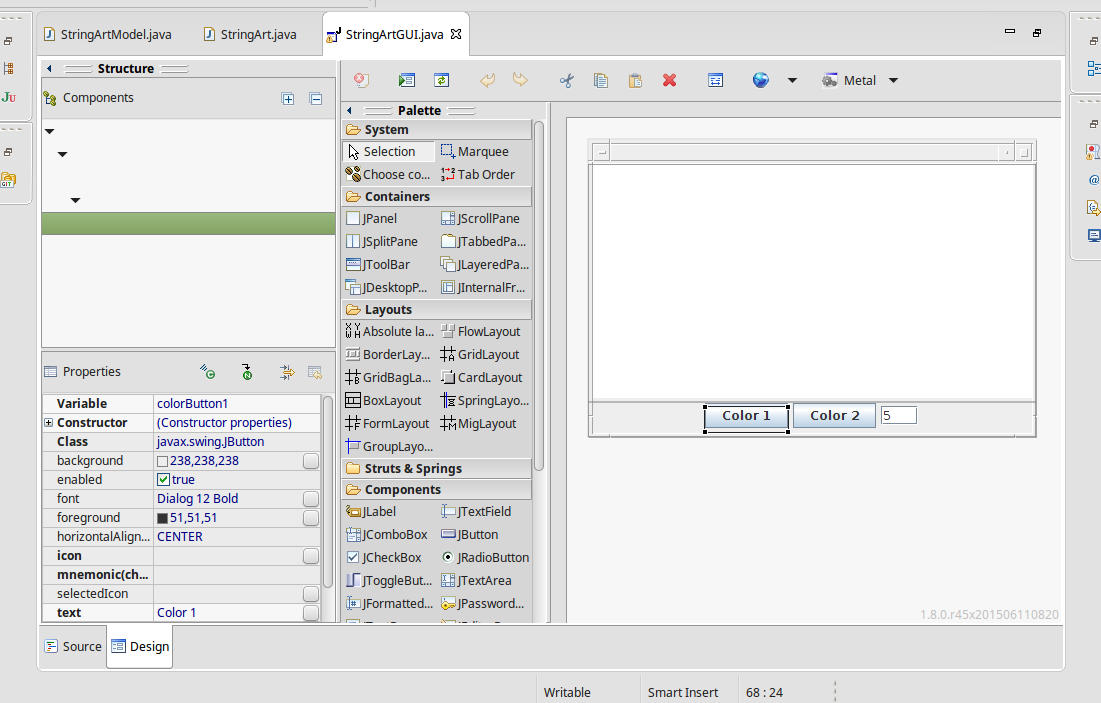
Now we are ready to create a separate StringArtGUI class.
 View recording.
-
Right-click on the package. Select
New…Other…WindowBuilder=>Swing Designer=>Application Window. Name this asStringArtGUI. -
We can run this. It brings up an empty window. We want to fill that window with the same kinds of elements that we used in our manual example.
-
Click the Design tab at the bottom of the source pane.
-
See the image of our empty window. Click on the top bar. The properties tab shows that we have a variable named “frame” of type
Jframe. Click on the source tab to ses several uses of the variable name “frame”, including its initialization in theinitialize()function. Return to the Design window. Let’s rename “frame” to “mainWindow”. Check the source and see that this change has been carried out. -
Click in the main area. It shows that we have a
Containerand that it has already been assigned the layout managerBorderLayout. If you remember, that is what we chose as our overall layout in the manual design, so we are already one step ahead. Let’s save the file. -
In the central area of our window, we want a
JPanelthat will serve as our drawing canvas. With the mainContainerstill selected, click onJPanelin the Palette. Move the cursor over our window’sContainerarea, and you see the characteristic NSWE-Central patterns of aBorderLayout. Click in the central area to deposit our new panel there. -
The Properties pane updates to describe out new panel. Change the variable name to “canvas”. Now visit the source. You can see that canvas is just a local variable in
initialize(). We’re going to need to allow access to that from a number of different functions, so let’s change that to a data member.Highlight “canvas”. Right-click and select
Refactor…Convert local variable to field… Accept the defaults (private, initialize in current method). -
Back to the design. The properties shows that our canvas has a grey background color (238,238,238). Click the small button to bring up a color selector. Change this to white. Save .
-
We want a panel on the south to contain our various controls. Select the container again (easiest to use the Components area). Click on
JPanelin the Palette and place this panel in the South area. Let’s rename this variable to “controlPanel”. Save. -
We can try running again. You can see a white main area with a thin grey (our controlpanel) beneath it.
-
Select the control panel. The layout is shown in the properties area as
FlowLayout, which gives us a left-to-righ arrangement. That’s fine. Add two buttons labeled “Color1 “ and “Color 2” by selectingJButtonfrom the palette and depositing them in the control panel, than changing the text property. Also, change the names tocolorButton1andcolorButton2. Save. -
Next add a
JTextFieldto the control panel to hold our step size. The default number of columns is 10. Let’s reduce that to 3. Fill in the initial text of 88. We’ll fix that later. Save and run.
We actually have all of our GUI elements in place at the moment, but we don’t have any behaviors set up yet.
2.3 Implement behaviors and custom drawing
View recording.
-
Most of the behaviors will need to work with the StringArtModel info, so let’s get that set up. Return to the source. Add a data member “art” of type
StringArtModeland initialize it in theStringArtGUIconstructor. Save. -
Search for the place where we put 88 into the GUI text field. Change this to use the initial value from the model. Save.
-
Similarly, we want to set the background colors of the buttons to reflect the model initial values. Easiest way to do that is to use the Design properties box to change the background color, then return to the source pane, find those color settign commands, and replace by calls to our own setColor function.
-
Now let’s get the canvas painting properly. We need to override the paint() function for our canvas (the inherited paint() simply fills in the background color). Here we go back to the source. Look at the initialization of canvas. We will need a subtype of Panel in order to override the Paint function. Easiest to do this as an anonymous subtype overriding paint. Code for the override is almost identical to out manual version. Only change is the use of the “art” data member. Save & run. You can see that now we are really getting somewhere.
-
Back to design. Let’s add an event handler for the color1 button. Right-click on it it in the design view, select
Add event handler=>action=>actionPerformed.We are immediately taken to the source code with a new event handler attached to the button. We need to fill in the behavior we want. We do that. Note that we get an issue trying to access the local variable
colorButton1. So change that into a data member as we did earlier with canvas. Save & run. This time try the button. -
A simple copy and paste in the source window adds a similar handler for
colorButton2. -
Back to design. Add an event handler to the text box by right-clicking on it and selecting
Add event handler=>action=>actionPerformed.
Final listing:
import java.awt.EventQueue;
import java.awt.Graphics;

import javax.swing.JFrame;
import javax.swing.JPanel;
import java.awt.BorderLayout;
import java.awt.Color;
import javax.swing.JButton;
import javax.swing.JColorChooser;
import javax.swing.JTextField;
import java.awt.event.ActionListener;
import java.awt.event.ActionEvent;

public class StringArtGUI {

	private JFrame mainWindow;
	private JPanel canvas;
	private JTextField textField;
	private JTextField stepSizeIn;

	private StringArtModel art;
	private JButton colorButton1;

	/**
	 * Launch the application.
	 */
	public static void main(String[] args) {
		EventQueue.invokeLater(new Runnable() {
			public void run() {
				try {
					StringArtGUI window = new StringArtGUI();
					window.mainWindow.setVisible(true);
				} catch (Exception e) {
					e.printStackTrace();
				}
			}
		});
	}

	/**
	 * Create the application.
	 */
	public StringArtGUI() {
		art = new StringArtModel();
		initialize();
	}

	/**
	 * Initialize the contents of the frame.
	 */
	private void initialize() {
		mainWindow = new JFrame();
		mainWindow.setBounds(100, 100, 450, 300);
		mainWindow.setDefaultCloseOperation(JFrame.EXIT_ON_CLOSE);

		canvas = new JPanel() {
			public void paint (Graphics g) {
				super.paint(g);
				art.drawLines(g, getSize());
			}
		};
		canvas.setBackground(Color.WHITE);
		mainWindow.getContentPane().add(canvas, BorderLayout.CENTER);

		JPanel controlPanel = new JPanel();
		mainWindow.getContentPane().add(controlPanel, BorderLayout.SOUTH);

		colorButton1 = new JButton("Color 1");
		colorButton1.addActionListener(new ActionListener() {
			public void actionPerformed(ActionEvent e) {
				Color chosen = JColorChooser.showDialog(mainWindow, "Choose a color",
						art.getColor(0));
				if (chosen != null) {
					art.setColor(0, chosen);
					art.setColor (colorButton1, chosen);
					canvas.repaint();
				}
			}
		});
		art.setColor(colorButton1, art.getColor(0));
		controlPanel.add(colorButton1);

		JButton colorButton2 = new JButton("Color 2");
		colorButton2.addActionListener(new ActionListener() {
			public void actionPerformed(ActionEvent e) {
				Color chosen = JColorChooser.showDialog(mainWindow, "Choose a color",
						art.getColor(1));
				JButton button = (JButton)e.getSource();
				if (chosen != null) {
					art.setColor(1, chosen);
					art.setColor (button, chosen);
					canvas.repaint();
				}
			}
		});
		art.setColor(colorButton2, art.getColor(1));
		controlPanel.add(colorButton2);

		stepSizeIn = new JTextField();
		stepSizeIn.addActionListener(new ActionListener() {
			public void actionPerformed(ActionEvent e) {
				try {
		            Integer newSize = new Integer(stepSizeIn.getText());
		            art.setStepSize(newSize.intValue());
		            canvas.repaint();
		          } catch (Exception ex) {};
		        }
		});
		stepSizeIn.setText("" + art.getStepSize());
		controlPanel.add(stepSizeIn);
		stepSizeIn.setColumns(3);

	}

}