


Distributed Version Control
Steven J Zeil
Abstract
Distributed version controls models relax the dependency upon a central repository as the keeper of the one true project.
-
Every developer has a snapshot of an entire development history.
- In essence, you check out the entire past history of a project.
- And every checked out copy becomes an independent branch.
-
Developers may decide for themselves which of these branches should merge
- Merging and conflict resolution, which are treated as exceptional operations in centralized systems, are regarded as the norm in this model.
We will look at git, a popular distributed version control system.
Sounds Like Anarchy
-
In practice, projects often due have a central repository for “official” releases.
-
But splinter projects are easier to form
- and can continue to share some changes until the code base diverges too much.
A Synthesis of Local and Remote
In a distributed model, a developer maintains
-
a local repository
- into which changes can be committed (as in local models like rcs)
-
and periodically may synchronize with a remote repository
- which might be centralized or just another developer’s
Two-Level Commits
The local/remote division helps resolve a common dilemma in centralized VC systems:
- When or how often should we commit changes?
- In a centralized system, we have conflicting goals
- Safeguard against losing work: argues for committing frequently
- Avoid interfering with other developers by not checking in incomplete work
- In a centralized system, we have conflicting goals
A newly checked-out copy should always compile and yield a (roughly) working product.
a.k.a., “Don’t break the build!”
- In a two-level system, we can commit frequently to the local repository and only when a “unit” of work is completed, commit to the remote repository.
Matthew McCullough’s tongue-in-cheek critique: Please. Stop using Git.
1 git
git Revisions
-
Unlike earlier VC systems, a git revision is a state of the entire project rather than of a single file/directory.
- After committing a change, the entire system, even unchanged files, advance to a new revision ID
- Of course, “behind the curtain” you are still going to have incremental diffs, but that does not affect our visible interactions
- After committing a change, the entire system, even unchanged files, advance to a new revision ID
-
Because of the distributed model,
- revision numbers cannot simply be incremented in any meaningful fashion
- there is a need to easily determine when two revisions in two different repositories are, in fact, copies of the same system state
-
Revision numbers are therefore replaced by hash codes computed over the file set that constitutes the entire project
git Revisions
A git repository contains, conceptually, a collection of snapshots (a.k.a., commit objects, a.k.a. revisions, a.k.a. versions).
Each snapshot contains
-
The set of files for the project
-
The name of this snapshot (hash code)
-
References to the parent snapshots
- Most have one parent
- Initial commit would have zero
- Merges can result in a snapshot with multipel parents
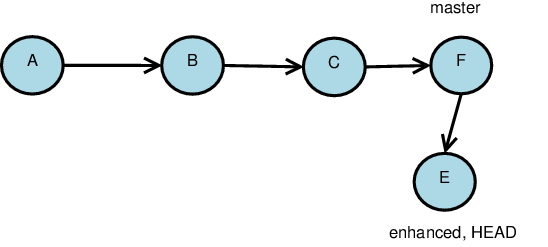
Heads
A git repository also contains a collection of heads.
These are human-assigned names for selected snapshots.

-
Heads refer to the most recent snapshot in a chain of commits
- Hence heads actually identify branches
-
Every repository has a head “master”.
-
At any given time, one head is considered active. This one is aliased to the head “HEAD”.
How shall I name thee?
Snapshots in a repository may be identified by giving
-
Its SHA1 hashcode
-
A long enough prefix of that hashcode to be unique
-
By a head
-
Relative to one of these:
^means “parent-of”- e.g.,
HEAD^would be the state before our most recent commit
- e.g.,
1.1 History
Common Local History Commands

-
git add filesstages modified files, scheduling the current version to be included in the next commit (recursing through directories)- An intermediate step not needed in earlier VC systems
-
git commit -m messagecommits all staged changes to the local respository- Add a
-ato add all modified files in the current directory and below to the staging set
- Add a
-
git statuslists modified files -
git diff filedisplays what was changed
1.2 Exploration
Every Local Repository is a Branch
So one way to “branch” in git is to simply check out a new copy.
But sometimes we want to branch within a local repository
Branching Within a Local Repository
-
git branch newHeadName/*-i desiredParentSnapshotcreates a new branch
-
git checkout branchHeadswitches to a new branch
- Replaces the files in the current directory by a copy of the state for that branch.
When Should I Commit? (Another perspective)
git users consider branches to be cheap.
So some advocate
-
Always work in branches
-
Keep the master branch in a releasable state
Remember, every local copy of the repository a branch in its own right. So one way to achieve the same effect is to commit frequently in your local repository but only push to the central repository when you have something in a releasable state.
This approach delays making your unfinished code available to other members of your team. Whether this is a viable approach depends on
-
Whether your local repository is backed up.
-
The chances of other team members making conflicting changes.
-
The longer you go between pushes and pulls, the more likely you are to encounter merge conflicts and the harder they will be to resolve.
-
Merging Local Branches
-
git merge headproduces a new snapshot representing the merge of the current one (
HEAD) with the named head.The merged revision will have both HEAD and head as parents.
- git identifies the more recent common ancestor of the two branches and performs a 3-way merge
- If a change (compared to the common ancestor) does not conflict (overlap) any changes from the other branch, the change is copied automatically into the merged state.
- If conflicts are determined, markers are inserted into the working copy of the file and the user alerted.
- If the merge completes without conflict, the resulting merged state is committed.
- If conflicts were found, the working copy is updated but no commit takes place.
- git identifies the more recent common ancestor of the two branches and performs a 3-way merge
-
Branches not needed after a merge can be deleted
git branch -d headremoves the head name from the repository (but does not actually delete the history of changes along the branch.
2 Collaboration
Collaboration in git takes the form of interaction between your local repository and a remote repository.
- Concepts (and, sometimes, commands) are much the same as in the local mode
Starting from a Remote Repository
If you are working with an existing remote repository
git clone remoteSpec
creates a new local repository as a copy of the remote one.
- The remoteSpec names the remote repository
- Could be a simple file path if on the same machine
- Could be an http:// URL (generally for anonymous access)
- Could be an ssh address
Cloning
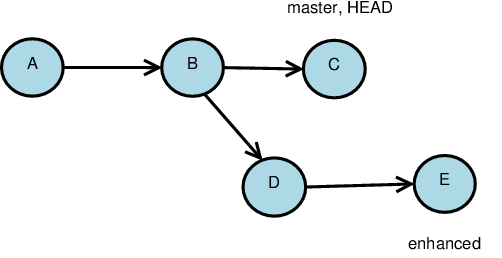
Suppose that we have a remote repository with two branches and a few commit objects on each.
-
Our local cloned repository will remember its remote origin repository.
-
All heads from the remote repository will be cloned as origin/head
-
We will get a local
masterhead -
You can request local heads for non-master branches by tracking, e.g.
git branch --track enhanced origin/enhanced
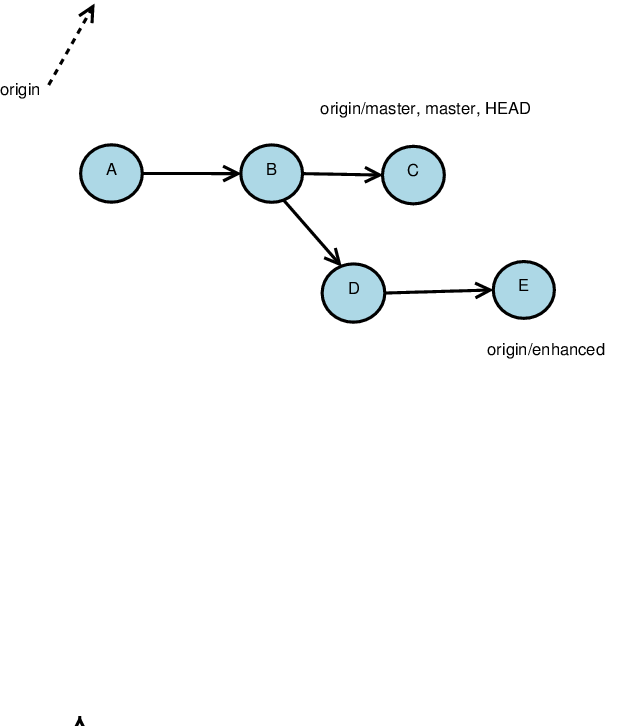
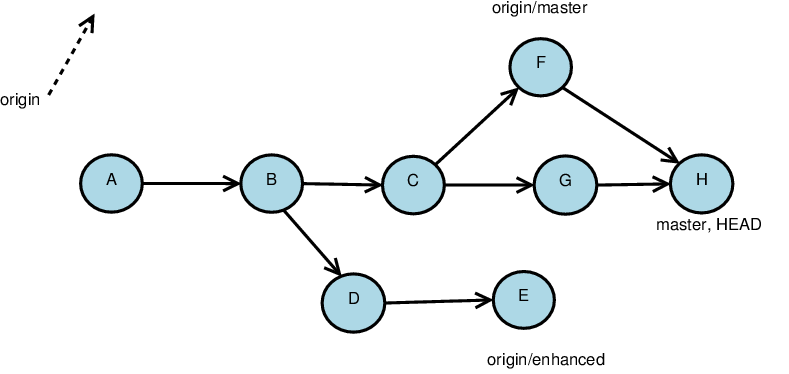
Life after Cloning
Starting from this local repository, …
… suppose each repository adds a commit along the trunk:
Our local heads separate from the remembered positions of the remote ones.
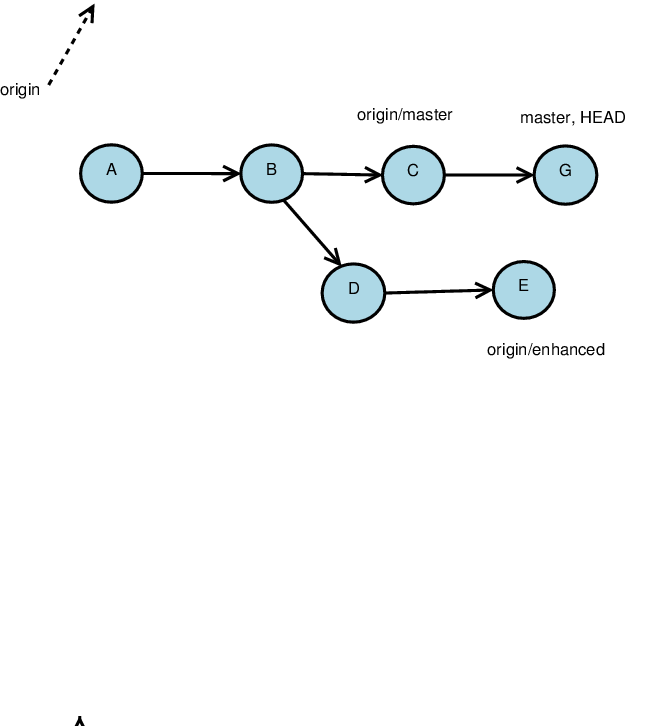
Fetching Remote Changes
The basic command to get changes from the remote repository is git fetch
Remember, each repository is, in essence, a new (set of) branch(es)
-
If states are not identical, they are fetched as new branches
-
Local heads are unaffected
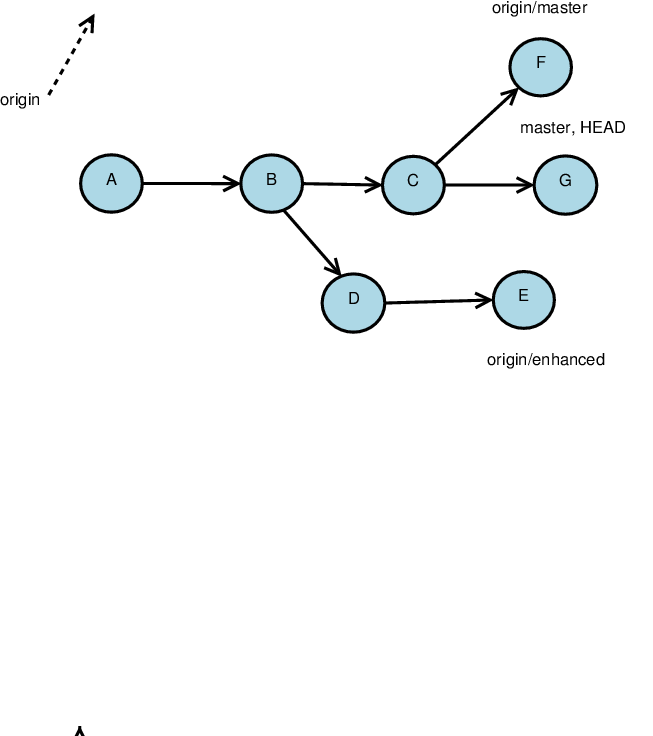
Pulling Remote Changes
More commonly used than fetching is pulling, which combines a fetch and a merge
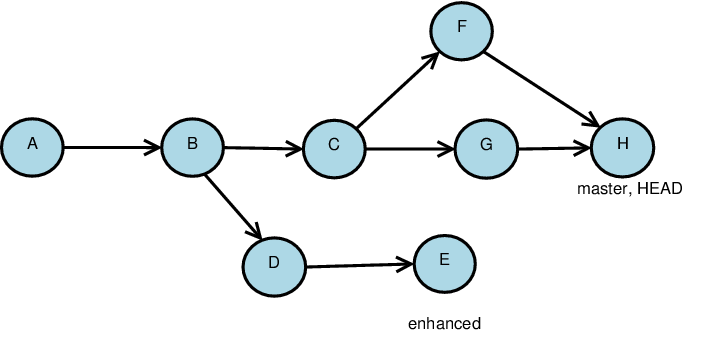
Starting with this remote repository…
…and this local one.
(Note that commits (F, G) have been made to both repositories since the clone was created.)
Then
git pull origin master
yields this new version of the local:
Pushing to the Remote Repository
The push command
-
sends local commits to a remote repository
-
Advances the remote head marker to the end of the list of changes.
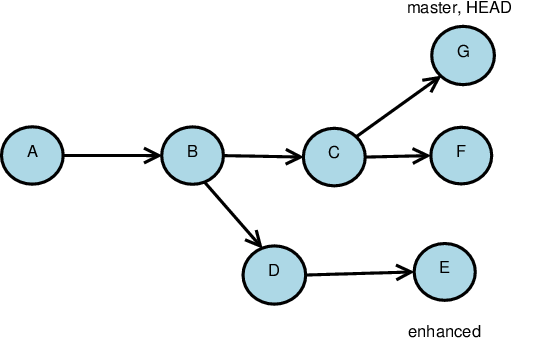
If the remote repository looks like this
and our local repository looks like this
git push origin master
yields this remote repository.
Push is NOT the Opposite of Pull
It’s actually the opposite of fetch
- No merge is done when pushing
This leads to an important restriction
The remote head must point, before a push, to an ancestor of the commit that it would point to after the push.
This Push Will Fail
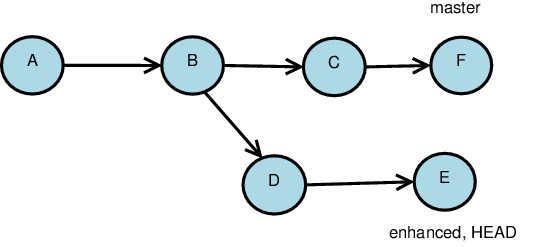
If the remote repository looks like this
and our local repository looks like this,
- the push will fail
because if it went through, we would lose access to a state already committed in the remote repository.
Avoiding Bad Pushes
-
Easiest thing to do is to do a pull into the local repository first, then do the push.
- And hope no one sneaks in ahead of you
-
An alternative is rebasing
Rebasing
Rebasing changes the parent relationship of the current head so that it appears to have been derived directly from some other selected head.
 If we start with this and do
git rebase master
 we get this.
- Now looks like
enhancedwas derived directly from themasterhead.
The Perils of Rebasing
For all the talk about rebasing in the git literature, you would think it was a very common operation.
But,
-
rebasing loses information
- with usually very little savings in storage
-
done at the wrong time, can make pushing to a remote server much harder
Why Rebase?
Generally recommended only for
-
Managing an unshared branch that you want to keep up to date with the
masterand don’t care if you lose history. -
Recovering from a failed
pushwhen someone else sneaks in between yourpulland your subsequentpush.- You
fetchtheir changes - Then rebase your head to appear as if it were derived from their head.
- You can then
push, because you have guaranteed that the remote head is an ancestor of yours-
Unless someone else sneaks in yet another
pushwhile you are doing the rebase. -
Isn’t distributed access fun?!
-
- You

3 Eclipse Integration
The (Egit) plugin integrates git into Eclipse.
- Egit has recently been incorporated into the Eclipse main update/plugin distribution site.
- Help is available within Eclipse, or from the reference manual on the Library page.
Operation is similar to the CVS and SVN plugins, except that
-
The
Teammenu gains new commands topushandpull. -
There is no
New ... Project from Gitoption.- Instead, use the
Importmenu.
- Instead, use the
-
A typical work session
 using
using egit
Eclipse, git, and a Forge
New projects:
-
A Forge environment will create an empty repository
-
Use the Git Repository Exploring perspective to clone the repository
.- Store it outside your normal Eclipse workspace.
-
Create a directory to hold the project as a sibling of the .git directory you have just obtained.
- Put at least one file of content (e.g., a build.xml file) in that directory.
-
In Eclipse, do
File⇒Importand select Git. Follow the instructions to name your local repository that you just cloned and “Use New Project Wizard”. -
When the regular project wizard starts, direct it to your project folder you created in step 3.
-
After the new project wizard is completed, Eclipse still will not show the project as managed by Git.
- Use
Team⇒Share project .... You’ll be asked what repository to use. Let Eclipse try to find it. (It should be able to do so).
- Use
-
Use
Team⇒Add to indexto add files to version control. -
Team⇒Commit(or Synchronize). -
Team⇒Push.
Existing Projects
-
A Forge environment will contain instructions/settings on how to access the existing repository
-
Use the Git Repository Exploring perspective to clone the repository.
- Store it outside your normal Eclipse workspace.
-
In Eclipse, do
- Create a new Java project, outside of the default workspace location. For the location, navigate to your newly created copy of the project directory, within the directory where you cloned the
gitrepository. - Or, for non-Java projects,
File⇒Importand select Git. Follow the instructions to name your local repository that you just cloned and use the New Project Wizard.
When the regular project wizard starts, direct it to your project folder you created in step 3.
- Create a new Java project, outside of the default workspace location. For the location, navigate to your newly created copy of the project directory, within the directory where you cloned the
-
After the new project wizard is completed, Eclipse might not show the project as being managed by Git.
- Use
Team⇒Share project .... You’ll be asked what repository to use. Let Eclipse try to find it. (It should be able to do so).
- Use
-
Use
Team⇒Add to indexto add files to version control. -
Team⇒Commit(or Synchronize). -
Team⇒Push.
from The System