

Network Conferencing: Google Meet 2
Steven J Zeil
In this course you will be working in teams, and your team members might not be able to meet with you in person. Although email, forums, and wikis can serve for much communication, there will be times when you need to talk “synchronously”.
This is the second of two exercises to explore options in network conferencing. In the first exercise, you joined a meeting set up by your instructor. In this exercise, you will set up meetings with each other.
1 At Least 48 Hours Before Your Recitation Section
-
Log into your recitation section in Blackboard. Find your WebConference group from last week’s exercise, go to your group’s discussion board, and enter the thread created during last week’s session.
Take note of the number you assigned yourself. Keep this page open so that you have access to everyone’s ODU email address.
-
Navigate to calendar.google.com and log in with your ODU account.
-
Navigate to the day of your recitation. Click on the time slot closes to the start of your recitation, dragging the box down to cover the time of your recitation.
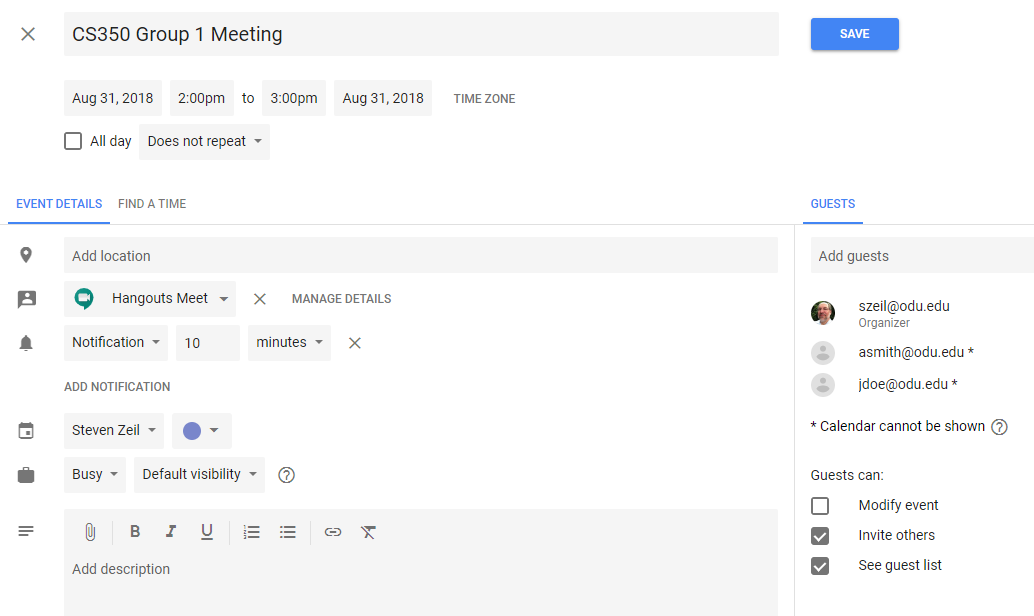
A “New event” box will pop up. Click the “More Options” button to get to the detailed page.
-
Complete the meeting setup by supplying the requested information.
-
Enter a meaningful name for the Event (e.g., CS 350: Group 1 Meeting).
-
Enter the start and end times. Set the start time for the beginning of the meeting. (The end time is an estimate.)
Select the time of your event as follows:
-
If your number in the group discussion board was 1, schedule your event at the starting time of your recitation section.
-
If your number in the group discussion board was 2, schedule your event at 10 minutes after the starting time of your recitation section.
-
Continue in this matter, so that if your number was
N, you would schedule your event at(N-1)*10minutes after the start of your recitation section.
-
-
If you see an “Add Conferencing” button in the place of the “Hangouts Meet” indicator shown here, click that to add the video conference.
-
In the “Add guests” area, enter the ODU email addresses for each of your teammates (
username@odu.edu) and click add.-
You may find that Calendar offers to auto-complete some of these for you.
-
If your personal number in the group discussion board matches the group number, then add the instructor’s email,
tkennedy@cs.odu.edu, to the invitation list. -
If your group has fewer members than your group number, the highest-numbered person in the group should invite the instructor. But make the time of that meeting (G-1)*10 minutes after the start of your recitation section, where G is the group number rather than your personal number.
-
At the end of this process, every member of the group will have issued an invitation to every other member of the group, with the invitations spaced 10 minutes apart.
One of those invitations will have been issued to the instructor. The instructor will have a different time with each group.
-
-
Click “Save” when you are done. Invitations will be sent to all of the group. These will include a link allowing direct access to the conference.
-
Next go to Google Drive, which you can select from the Google Apps button
 .
.-
If your number in the Group Discussion Forum was odd, create a new Google Doc document. Copy and paste a few paragraphs from this web page into that document. Exit the document and return to the Drive directory page.
-
If your number in the Group Discussion Forum was even, create a new Google Drawings picture. Draw a shape of your choice. Exit the document and return to the Drive directory page.
-
Click in the title area and give your document/drawing a title.
-
Return to the directory page. Right-click on your new document/drawing and select “Share…”. Enter the email addresses of your group members with “Can Edit” permission.
-
2 During Your Meeting
-
Navigate to calendar.google.com and log in with your ODU account (
username@odu.edu). You should find that you have a series of scheduled events, one every 10 minutes. -
Locate the appropriate entry within your calendar.
-
Click on the event, then click Join Meeting.
-
Join your meetings as scheduled. (You will be moving from one meeting are to another every 10 minutes.)
-
One thing that you must always be prepared for is that someone’s connection will be dropped and you need to get them back into the conversation.
Have the group member whose meeting will be coming up next
close their browser to simulate a dropped connection. (During the final meeting, have group member #1 do this.) They should be able to return by starting from their calendar entry or email.- In the bottom left of the screen, you will see a control next to the meeting name. CLicking that brings up a summary of the meeting connection info that you can copy (with the “Copy joining info” button and then paste into en email.
-
When you re all back together, click on the Chat control
 to open the chat area to the right of the video. Type a bit as you please.
Normally, you would not make much use of chat during an audio/video conference, but it can be useful when someone is having audio issues or when you want to share a URL, a bit of code or other text that needs to be preserved “exactly”.
-
The “host” who called each particular meeting should tell everyone the title of the document/drawing that he or she shared with the team. If necessary, type out the title in the Chat box.
Everyone should then navigate to that document/drawing. Everyone can try typing a few words or manipulating a few shapes. Notice how updates can be seen simultaneously at different locations.
(You can do the same kind of thing with Google Drive shared documents outside of video calls as well. But the ability to edit simultaneously is an interesting and unusual feature.)