


Build Managers
Steven J Zeil
Abstract
A build manager is a tool for scripting the automated steps required to produce a software artifact.
We will start this module by looking at what types of services we would like to obtain from build managers.
These will be motivated by looking at some sample projects to consider the steps required to build them. An important lesson will be that builds often involve more that the “obvious” reuqirement of compiling and linking the code.
We will then survey some of the options for build managers, including scripting, IDE project managers, and dependency-based and task-based build management tools.
What Should a Build Manager Do?
A good build manager should be
-
easy to use
-
easy to set up for a given project
-
efficient in performing the build
- avoid redundant/unnecessary actions
- detect and abort bad builds in progress
-
incremental
- allow focused/partial builds
-
flexible
- allow for a variety of build actions
- on a variety of platforms
-
configurable
- permit the management of multiple artifact configurations
1 Some Sample Project Builds
Here are some of the project builds I have had to automate in the opening weeks of one semester:
1.1 Student Programming Assignment
Set up to allow students to easily compile code for an assignment.
-
Build each missing or out-of-date .o file by compiling a corresponding .cpp file.
-
Record which .cpp files and .h files were used during the compilation so that future builds can determine what would future source code changes would make this .o file outdated.
-
-
Link all .o files to produce an executable
1.2 Code Annotation Tool
The code annotation tool is a program I use to convert C++ and Java code with optional markup comments like this into this.
Building the Code Annotation Tool
The steps involved in building this tool are:
-
Run the program jflex on each file in src/main/jflex, generating a pair of .java files that get placed in src/main/java
-
Compile the Java files in src/main/java, placing the results in target/classes
-
Compile the Java files in src/test/java (using the target/classes compilation results, placing the results in target/test-classes.
-
Run the JUnit tests in target/test-classes.
-
If all tests pass, package the compiled classes in target/classes into a .jar file.
It’s worth noting how many of the steps in this project build are not simply compile and link steps.
1.3 Class Assignment Setup
Class Assignment Setup
In preparing to release a programming assignment to a class, the steps are
-
Setup:
- Copy all of the files that I will provide to students from a Public directory into a Work directory.
- Copy all of the files from my Solution directory into that Work directory
-
Build solution
- Compile any .cpp files in the Work directory
- Link the resulting .o files.
-
Run the executable produced in the last step on each test*.dat in the Tests directory, capturing the output as a corresponding .out file.
-
Copy all source code from the Work directory into a winWork directory.
-
Use a cross-compiler to compile and link the .cpp files in winWork into a Windows executable
-
Install:
- Copy the two executables and the contents of the Public directory into a release area accessible to students.
- Set the permissions on the copied files so that they can be accessed.
- Copy any .html and graphics files for the assignment to the course website.
1.4 Posting Slides and Lecture Notes
The lectures notes for this course are prepared through a process:
-
Setup
- Convert all graphics to PNG or PDF:
- For each GIF file in the directory with no corresponding PNG file, run convert to produce a PNG.
- For each FIG file in the directory with no corresponding EPS file, run fig2dev to produce an EPS.
- For each Dia file in the directory with no corresponding EPS file, run dia to export as EPS.
- For each EPS file in the directory with no corresponding PDF file, run epstopdf to create a PDF. \eii Annotate source code:
- For each C++ or Java file with no corresponding HTML file, use the code annotation tool to generate an HTML file.
- For each C++ or Java file with no corresponding TeX file, use the code annotation tool to generate an TeX file.
- Convert all graphics to PNG or PDF:
-
Generation: For each desired document output format,
- Run a preprecessor on the markdown file containing the document source.
- Run a markdown processor to generate HTML.
- Apply an XSLT stylesheet to add format info and to split the document into slides/pages.
-
Deployment:
- Synchronize this directory with the corresponding directory of the website, or
- Prepare a zip file with the contents of this directory that can be uploaded to a remote webserver (e.g., Blackboard).
2 Structural Architecture of a Development Project
Let’s talk about how development projects are typically organized into files, directories, etc.
2.1 Projects and Sub-projects
A project consists of one or more more sub-projects.
- Even if we conceive of a project as a single entity, it’s worth treating it as having a single sub-project
- A hedge against changing our minds later.
- Sets a standard for consistent tool use and setup
What Constitutes a Sub-project?
A sub-project is generally defined as the code and data that yields a single deliverable.
Examples of deliverables include
- an executable program
- a library
- Java
.jaror - C/C++
.a,.lib,.so, or.dll
- Java
- a reference manual
Example: The AlgAE project has sub-projects
sub-project deliverable algae-client-server algae-4.1.jaralgae-cppserver libalgaecpp.aalgae-referenceManual referenceManual.pdfdemos/FordToppBST FordToppBST.zipdemos/ReferenceManualJava algae-jrefman.jar
Why divide a project into multiple sub-projects rather than into multiple smaller independent projects?
-
The entire project is stored in a single location/repository.
-
The entire project can be built with a single command.
- The entire project can share certain configuration data.
- Sub-projects may be more tightly coupled than would be desired of independent projects.
2.2 The Project Directory
Typically contains
- Top-level project documentation.
- Overall project build & configuration information
- One sub-directory per sub-project
- Version control and configuration management information
2.2.1 Example: AlgAE
Top-level directory contains:
- README.md, LICENSE.md
build.xml: builds the sub-projects in the correct order.git,.gitignore,ivysettings.xml(version control and configuration management)- Directories:
- algae-client-server
- algae-cppserver
- algae-reference-manual
- demos
- Reports
All but the last are sub-projects.
C/C++ projects might add directories that will (after the project is built) contain the various sub-projects’ deliverables:
- bin
- lib
2.3 Sub-Project Directory (Java)
Contains:
- sub-project build & configuration
- source code directory
- project and test data
- target directory for deliverables and other build projects
- When source code is compiled, output is placed here rather than in the source code directory
2.3.1 Apache Project Directories
The Apache Foundation hosts many open source projects, which organize their projects & sub-projects like this:
src/     # anything supplied/edited by the programmers
target/  # initially empty, holds products of the compilation/build
The src/ directory is split into separate directories for the "real’ code and for the test code.
src/
|  main/   # things that contribute directly to the deliverable
|  test/   # things used for testing but not delivered
target/
“Deliverables” are usually an archive of some kind.
-
If the project is supposed to produce a Java application or a Java library, the deliverable is usually packaged in a Jar.
-
Server-side web applications are delivered in a War or an Ear.
-
Source code is sometimes packaged in a Jar, but more often in a Zip. (Usually, though, when we talk about deliverables in this section, we’ree referring to “binary” deliverables.)
-
Android apps are packaged in an APK.
The division of the source files into separate main/ and test/ makes it easier to eventually construct those deliverable archives because we won’t treat entire directories worth of stuff uniformly, rather than having to select desired materials on a file-by-file basis.
src/main/ is further subdivided:
src/
|  main/
|  |  java/      # Java source code, compiled into target/classes
|  |  resources/ # data files that will be included in the deliverable archive
|  |  data/      # data files required during build but not part of deliverable
|  test/
target/
|  classes/ # data and compiled code that are packed into the .jar deliverable
|  project.jar # the deliverable
(These directories can be omitted if they are empty.)
Java libraries and applications can read data from files within their own distribution archive with only slightly more difficulty than reading from an ordinary file. To do so, the Java code is written to search the Java CLASSPATH, the same path used to hunt for the compiled Java code.
They cannot, however, write to those data files. The data access is read-only.
The src/test/ directory is split in an analogous fashion:
src/
|  main/
|  |  java/
|  |  resources/
|  |  data/
|  test/
|  |  java/      # Java source code, compiled into target/test-classes
|  |  resources/ # data files, available during testing via CLASSPATH
|  |  data/      # test data
target/
|  classes/
|  test-classes/ # data and compiled code for unit testing
|  project.jar
Test resources are intended to be accessible during testing via the code already written for accessing main (deliverable) resources. One way to support this is to copy the src/test/resources contents into target/test-classes, so that the same CLASSPATH-based mechanisms to locate the compiled test code will also find the test resources.
2.3.2 Android/Gradle Project Directories
A similar directory structure is employed for Android projects. The Gradle build manager, which we will cover later in this section, has made the Android structure its default for Java projects, making it a popular organization for non-Apache projects.
The most obvious difference is that the products of the build are stored in build instead of target.
src/     # anything supplied/edited by the programmers
build/  # initially empty, holds products of the compilation/build
The src/ directory is laid out identically to the Apache organization:
src/
|  main/
|  |  java/      # Java source code. After compilation, is part of the deliverable.
|  |  resources/ # Data files that will be included in the deliverable, accessible via CLASSPATH
|  |  data/      # Data files needed for the build, but not part of the deliverable.
|  test/
|  |  java/      # Java source code for testing, will not be part of the deliverable
|  |  resources/ # data files, available during testing via CLASSPATH
|  |  data/      # test data
build/
The build directory, however, has a more detailed breackdown than in the Apache project:
src/
|  main/
|  |  java/      # Java source code. After compilation, is part of the deliverable.
|  |  resources/ # Data files that will be included in the deliverable, accessible via CLASSPATH
|  |  data/      # Data files needed for the build, but not part of the deliverable.
|  test/
|  |  java/      # Java source code for testing, will not be part of the deliverable
|  |  resources/ # data files, available during testing via CLASSPATH
|  |  data/      # test data
build/
|  classes/         # Compiled code
|  |  main/         # Compiled code from src/main/java/, will be part of the deliverable
|  |  test/         # Compiled code from src/test/java/, will not be part of the deliverable
|  |  libs/         # Deliverables are placed here.
|  |  reports/      # Generated reports including documentation, test coverage, analysis, etc.
|  |  test-results/ # Outputs from testing
|  |  tmp/          # Work area for general temporary files
2.3.3 Variations
-
Additional files and directories in
target/are common.- I usually have a
target/reports/directory for testing and other report generated during the build. - If my tests need to produce output files, I usually try to put those in
target/test-outputs(so they can be easily cleaned up)
- I usually have a
-
Analogous to
main/javaandtest/java, we can have directories for source code in other programming languages.-
For example, the code annotation project has source code in
jflex, which actually is compiled to produce Jave code intarget/gen-source/, which is then itself compiled intotarget/classes.src/ # anything supplied/edited by the programmers | main/ # things that contribute directly to the deliverable | | java/ # Java source code, compiled into target/classes | | jflex/ # JFlex source code, compiled into target/gen-source | | resources/ # data files, copied into `target/classes` | | data/ # data files required during build but not part of deliverable | test/ # things used for testing but not delivered | | java/ # Java source code, compiled into target/test-classes | | resources/ # data files, copied into `target/test-classes` | | data/ # test data target/ # initially empty, holds products of the compilation/build | classes/ # data and compiled code that are packed into the .jar deliverable | gen-source/ # automatically generated Java source, compiled into target/classes | test-classes/ # data and compiled code for unit testing | project.jar # the deliverable
-
-
Later in a project, I might add separate
src/andtarget/subdirectories for integration & system testing.
Example: see this structure in the Code Annotation project
2.4 Sub-Project Directory (C/C++)
Much more variation exists. One possibility is:
include/ # header files
|
src/ # compilation units (.c and .cpp files)
|
bin/ # executables and .o files produced by compiling src/
|
lib/ # libraries produced by combining object files
- Sometimes
.ofiles are placed in a separateobj/directory. - Sometimes executables and libraries are copied directly to a project-level
bin/orlib/directory.
2.4.1 Android-ish structure
Increasingly common is this approach, inspired by the Apache/Android Java styles:
src/
|  main/
|  |  cpp/       # C++ source code. .cpp files and local headers
|  |  headers/   # Header (.h) files that need to be visible to main code and
|  |             #   to tests.
|  |  public/    # For library projects, the header files that will be exported
|  |             #   as part of the delivered library.
|  test/
|  |  cpp/       # Unit test code
|  |  data/      # test data
build/
|  exe/         # Executables
|  |  main/     #   - from main/cpp
|  |  test/     #   - from test/cpp
|  lib/         # libraries constructed from object code
|  |  main/     #   - from obl/main
|  obj/         # Compiled object code
|  |  main/     #   - from main/cpp
|  |  test/     #   - from test/cpp
|  tmp/         # Work area for general temporary files
3 Types of Build Managers
Why Not Just Write a Script?
We could simply write a “simple” script to perform each of the steps in sequence …
#!/bin/sh
cp Public/* Work/
cp -f Solution/* Work/
g++ -o Work/program Work/*.cpp
find Tests -name 'test*.dat' -exec sh runTest.sh Work/program {} \;
mkdir WinWork
cp Work/*.h Work/*.cpp WinWork
x86_64-w64-mingw32-g++ -o WinWork/program WinWork/*.cpp --static
mkdir $releaseDir/bin
mkdir $releaseDir/bin/Linux
cp Work/program $releaseDir/bin/Linux
mkdir $releaseDir/bin/Windows
cp WinWork/program $releaseDir/bin/Windows
chmod 775 $releaseDir/bin/*/program
cp *.html *.png $website/
Scripting
But how does this fare according to our earlier build manager goals?
-
easy to use? **Y**
-
easy to set up for a given project? **N**
-
efficient in performing the build?
-
avoid redundant/unnecessary actions **N**
-
detect and abort bad builds in progress **?**
-
-
incremental?
- allow focused/partial builds **?**
-
flexible?
-
allow for a variety of build actions **N**
-
on a variety of platforms **N**
-
-
configurable?
- permit the management of multiple artifact configurations **?**
3.1 IDE project managers
Most IDEs come with a built-in project manager.
-
typically limited to compiling and linking
-
maybe some support for packaging
3.2 Dependency-Based Managers
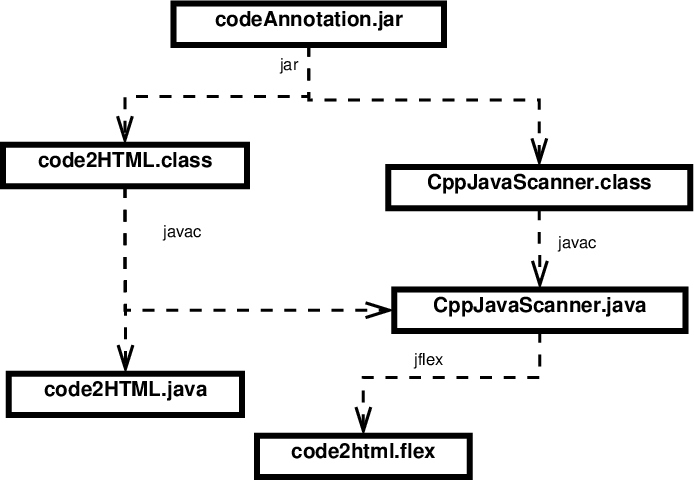 Some build managers are based on the idea of a dependency graph:
-
Boxes are files.
-
Arrows denote dependencies. “A depends on B” means that if B is missing or changed, then A must be (re)generated.
-
Labels on arrows indicate the program used to generate the file at the base of the arrow.
Analysis of such a graph facilitates
-
efficiency - easy to tell what needs to be rebuilt after a change
-
incrementality - can determine required build step for any file, not just the “final” one
make is the canonical example of a build manager of this type.
3.3 Task-Based Managers
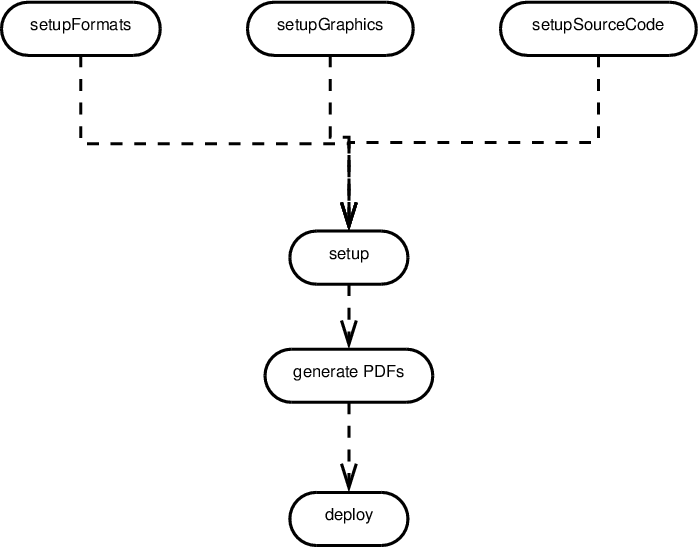 Other managers are based on the idea of interdependent tasks.
-
Ellipses are tasks (activities). Each task can involve multiple steps.
-
Arrows denote success dependencies. “A depends on B” means that A will be run after B and only if task B finished successfully.
This approach facilitates
-
ease of setup: usually less detailed than a full file-based dependency graph
-
incrementality - can request any intermediate step
ant is based on this approach.