  | 1 of 28


 |   |
| | 1 of 28
| |
Gradle is a build manager based upon an Ant-like task dependency graph expressed in a more human-friendly notation, with a Maven-like ability to express standard project layouts and build conventions.
Gradle devised by GradleWare, founded by Hans Dockter, released in 2012
Has become the standard build tool for Android
Tries to strike a middle ground between Ant and Maven
Keep:
Leave
XML as a build language.
Inability to express simple control flow
Keep:
Dependency management
Standard directory layouts and build conventions for common project types.
Leave
XML as a build language.
Inflexibility
Inability to express simple control flow
Build files are written in Groovy
Gradle is built on top of the Ant libraries.
Hans Dockter describes Gradle, compares it to Ant and Maven, and shows lots of examples (in Eclipse).
Suppose that you are building your project with Gradle.
If you set up your project with the Gradle Wrapper, you get a simple script named gradlew.
gradlew checks to see if the system on which it is running has Gradle installed.
$USER_HOME/.gradlegradle (old installation or new), passing any parameters you supplied to the gradlew command.This works nicely for projects that distribute their source code via any of the version control systems that we will be discussing later.
gradle looks for its instructions in a file named, by default, build.gradle
The gradle command can name any task (or list of tasks) as targets to be built, e.g.,
gradle setup compile
If no target is given, gradle can use a default task if one has been declared in the build file.
gradle Options
Some useful options:
-file or -buildfilegradle Tasks
Some built-in tasks that you can use as targets:
--task, ask for a description of a specific task.Usually accompanied by an option
--gradle-version versionNumber
to generate a wrapper for a specific version of gradle.
The gradle build file is a Groovy script, with Java-like syntax. Many of the more common Java API packages are imported automatically.
task upper << {
   String myName = "Steven Zeil";
   println myName;
   println myName.toUpperCase();
}
If this is placed in build.gradle, then we can run it:
$ gradle upper
:upper
Steven Zeil
STEVEN ZEIL

BUILD SUCCESSFUL

Total time: 1.747 secs
$
The basic elements of a Gradle build file are tasks.
Gradle tasks can correspond Ant targets.
A Gradle task can perform multiple actions.
task upper {
   doLast {
       String myName = "Steven Zeil";
       println myName;
       println myName.toUpperCase();
   }
}
Gradle tasks can correspond individual Ant tasks.
A Gradle task can perform multiple actions.
task copyResources (type: Copy) {
   from(file('src/main/resources'))
   into(file('target/classes'))
}
In Ant, we would have used a <copy> task within a larger Ant target for this purpose.
Before looking at the components of a task, we need to understand a bit about how Gradle works.
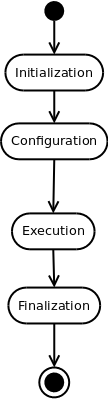
A Gradle run occurs in four specific phases.
Initialization takes care of things that affect how Gradle itself will run. The most visible activity during this phase is loading Gradle plugins that add new behaviors.
Configuration involves collecting the build’s tasks, setting the properties of those tasks, and then deciding which tasks need to be executed and the order in which that will be done.
Execution is when the tasks that need to be executed get run.
Finalization covers any needed cleanup before the Gradle run ends.
A Gradle task can be declared as easily as:
task myTask
A Groovy function with parameters, e.g.,
void foo (int x, int y, int z) { ... }
can be called using positional arguments:
foo (12, 14, 0)
or by using named arguments:
foo (z: 0, x: 12, y: 14)
One advantage of the latter form is that you don’t have to know the order in which the parameters appeared in the function declaration. The named form is even more useful when all or most of the parameters have default values and, in your call, you only want to supply the value to one or two parameters for which you don’t like the defaults.
Some tasks may need parameters:
task copyResources (type: copy)
You can add code to be run at configuration time by putting it in { } brackets just after the task name:
task copyResources (type: Copy)

copyResources {
    description = 'Copy resources into a directory from which they will be added to the Jar'
    from(file('src/main/resources'))
    into(file('target/classes'))
}
You can combine a configuration with the task declaration:
task copyResources (type: Copy) {
    description = 'Copy resources into a directory from which they will be added to the Jar'
    from(file('src/main/resources'))
    into(file('target/classes'))
}
For example, the Copy type copies files at execution time
task copyResources (type: Copy) {
    from(file('src/main/resources'))
    into(file('target/classes'))
}
The from and into calls are performed at configuration time.
The Copytype actually copies the files at execution time.
gradle will check to see, at configuration time, if the files already exist at the destination and appear to be no olderthan the ones at the source. If so, the copyResources task will be skipped at execution time.{ }, using the doLast operation.
task copyResources (type: Copy) {
    from(file('src/main/resources'))
    into(file('target/classes'))
    doLast {
       println 'Copy has been done.'
    }
}
or you can use that operation to add the code to an already-declared task object.
task copyResources (type: Copy) {
    from(file('src/main/resources'))
    into(file('target/classes'))
}
⋮
copyResources.doLast {
    println 'Copy has been done.'
}
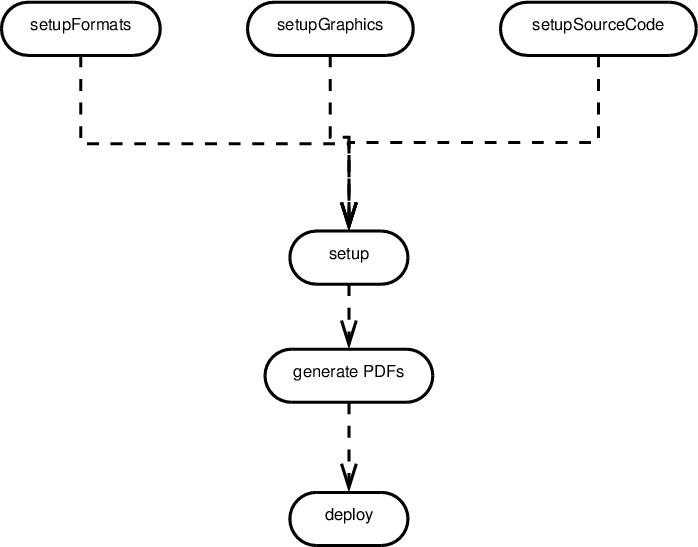
task setupFormat

task setupGraphics

task setupSourceCode


task generatePDFs (dependsOn: 'setup')
generatePDFs.doLast {  ➀
    println 'in task generatePDFs'
}

task setup (dependsOn: ['setupFormat',
                        'setupGraphics',
                        'setupSourceCode'])
setup.doLast {  ➁
   println 'in task setup'
}

task deploy (dependsOn: generatePDFs)
deploy.doLast {
    println 'in task deploy'
}
➀ : This line shows a dependency. Note that the task on which we are depending has not been declared yet.
➁ : The [a, b, ...] notation introduces a Groovy array value.
Running this gives:
$ gradle deploy
:setupFormat UP-TO-DATE
:setupGraphics UP-TO-DATE
:setupSourceCode UP-TO-DATE
:setup
in task setup
:generatePDFs
in task generatePDFs
:deploy
in task deploy
doLast (and doFirst) add actions to a task.
If we add the following to the previous script:
setup.doLast {
    println 'still in task setup'
}
$ gradle deploy
:setupFormat UP-TO-DATE
:setupGraphics UP-TO-DATE
:setupSourceCode UP-TO-DATE
:setup
in task setup
still in task setup
:generatePDFs
in task generatePDFs
:deploy
in task deploy
At its heart, a build file is a collection of tasks and declarations.
A task is a Groovy function. It has a name, a body, and, optionally,
The body of a task can contain multiple declarations and commands.
Gradle tasks are equivalent to Ant “targets”.
task playWithFiles {
    doLast {
        def files = file('src/main/data').listFiles().sort()    ➀
        files.each { File file ->                               ➁
            if (file.isFile()) {                                ➂
                def size = file.length()                        ➃
                println "** $file.name has length " + size      ➄
            }
        }
    }
}
➀ There’s several things going on here. Let’s take it piece by piece.
def declares a variable. In this case, the variable is named files.
Like most scripting languages, Groovy (and therefore Gradle) is loosely (dynamically) typed, so we generally do not bother declaring variables by giving their type, though that’s certainly possible.
file(...) returns a value of type File. In fact, this is a good old fashioned Java java.io.File, so we can look to the Java documentation to see what can be done with it.
One of the things we can do with it is to call listFiles(), which treats the File on the left of the ‘.’ as a directory and produces an array of File representing all the files in that directory.
And, knowing that listFiles() produces and array of files, it’s pretty obvious what .sort() would do.
We conclude that the variable files will hold a sorted list of all the files in directory src/main/data.
➁ The .each function is a Groovy function on arrays that allows us to iterate through the elements of the array, one at a time. On each iteration, we will store the current array element in the variable file which we have declared, for clarity, as being of type File.
➂ Another thing we can do with Files is to check and see if they are “regular” files as opposed to being directories, links, or other special cases.
Again, this is not a special Gradle function, but is part of the normal Java behavior of a File class.
➃ The call to file.length() is just an ordinary Java function call.
➄ Several interesting things happen here.
The ‘$’ inside the quoted string allows us to request the replacement of a simple expression by its value. So we won’t actually print “file.name”. Instead the expressions file.name will be evaluated and the resulting value inserted into the string to be printed.
This “$” string substitution has been a common shortcut in scripting languages for decades.
Now, Java Files do not have a public data member called “name”, so the expression file.name would fail to compile in Java.
Java Files do, however, have a public function member getName(). And here we run into another one of those shortcuts that Groovy, as a scripting language, introduces. In Groovy, the notation x.data is considered a shorthand for x.getData() when we are trying to fetch data and for x.setData(..) when we are trying to store data. So the Groovy statement
x.data = y.member;
is actually considered shorthand for
x.setData(y.getMember());
The + operator is the conventional Java String concatenation operator.
The ant tasks library is included within gradle. So any useful ant task can be called:
task compile {
  doLast {
    // Compile src/.../*.java into bin/
    ant.mkdir (dir: 'bin')
    ant.javac (srcdir: 'src/main/java', destdir: 'bin',
              debug: 'true', includeantruntime: 'false')
    ant.javac (srcdir: 'src/test/java', destdir: 'bin',
              debug: 'true', includeantruntime: 'false',
              classpath: testCompilePath)
    println 'compiled'
  }
 }
However, we probably would not use any of these:
Most Gradle users would use Java constructs for file manipulations, e.g., instead of
ant.mkdir(dir: 'bin')
they would write
file('bin').mkdir();
Gradle provides a Java plugin to handle compilation more easily.
Moreover, if we already had the Ant build file simpleBuild,xml, we could actually simply import it into a Gradle build:
ant.importBuild 'simpleBuild.xml'

task build (dependsOn: 'deploy') .doLast {  // "deploy" target from the Ant build file
   println 'Done'
}
Like Maven, Gradle can be used to quickly create new projects with a standard directory/file layout and a standard sequence of build tasks. E.g.,
gradle init --type java-library
sets up a project with src/main/java and src/test/java directories.
Using the Java plugin, a basic build with unit tests is easy:
settings.gradle
// A simple Java project
This file needs to exist, but can be empty.
build.gradle
plugins {
   id 'java'  ➀
}

repositories { ➁
    jcenter()
}
➀ This loads and runs the Java plugin.
As long as our source code is arranged in the Apache/Android directory style, it will be handled correctly.
➁ The repositories section on is concerned with configuration management (covered later)
This is all you need to compile Java code stores in src/main/java.
If you have unit tests, we need to add a little more info.
build.gradle
plugins {
   id 'java'
}

repositories {
    jcenter()
}

dependencies {
    testImplementation("junit:junit:4.12")   ➀
    testRuntimeOnly("org.junit.vintage:junit-vintage-engine:5.5.2") ➁
}

test {  ➂
    useJUnit()
}
The two sections at the end establish that
junit-vintage-engine, version 5.5.2, available.src/test directory contains our JUnit tests.You can find this entire project, with the Gradle files, here.
This project adds a stage before compilation to generate some of the source code that then needs to be compiled.
The settings.gradle file is unchanged.
Here is the build.gradle file:
build.gradle
plugins {
   id 'java'
   id 'org.xbib.gradle.plugin.jflex' version '1.2.1'  ➀
}

repositories {
    jcenter()
}

dependencies {
    testImplementation("junit:junit:4.12")
    testRuntimeOnly("org.junit.vintage:junit-vintage-engine:5.5.2") /
}

test {
    useJUnit()
}
jflex plugin,
jflex on code located in src/main/jflex to generate Java source codeYou can find this entire project, with the Gradle files, here.
A multi-project build in gradle is kept in a directory tree.
The top-most directory is the master project.
It contains the settings.gradle file.
Each subproject directory contains its own build.gradle file.
Any multi-project build in Gradle uses the settings.gradle file (usually in the common root containing the subproject directories) to identify the subprojects:
rootProject.name = 'manhattan'

include "application", "geomlib"
In this case, we have two subprojects. One provides the executable, the other a library of ADTs, with unit tests, constituting the bulk of the code design.
There is no need for build.gradle file at this level, although it would be legal to provide one if you have project-level steps to be carried out.
Of the two subprojects, the geomlib subproject is probably most interesting because it does the most. It compiles code into a library, then compiles and runs unit tests on that library code. By contrast, the application subproject only compiles code.
Here is the build.gradle file for the lib subproject:
plugins {
    id 'cpp-library'
	id 'cpp-unit-test'
}


unitTest {
    binaries.whenElementKnown(CppTestExecutable) { binary ->
        if (binary.targetMachine.operatingSystemFamily.linux) {
            binary.linkTask.get().linkerArgs.add('-pthread')
        }
    }
}
This listing starts off with two plugins, one for C++ compilation (into a reusable library) and the other for unit testing.
The unit test plugin can work with a variety of frameworks. Eventually, you should be able to load these frameworks as dependencies, much as you do in Java projects.
In this case, I am using CppUnitLite because it can be easily dropped into the directory with the unit tests.
Like most unit test frameworks, this one runs the tests in a separate thread (process). The unittest configuration here adds the required pthread library when compiling under Linux.
The application subproject is simpler, because it only has one job to do – create an executable. Here it is:
plugins {
		id 'cpp-application'
}

dependencies {
			implementation  project(':geomlib')
}
cpp-application plugin and:geomlib subproject
This dependency guarantees that the geomlib library will be constructed before this application is built and that it will be automatically included into the application compilation and link steps.
You can find this entire project, with the Gradle files, here.
| | 1 of 28
| |