

Working from a Command Line
Steven Zeil
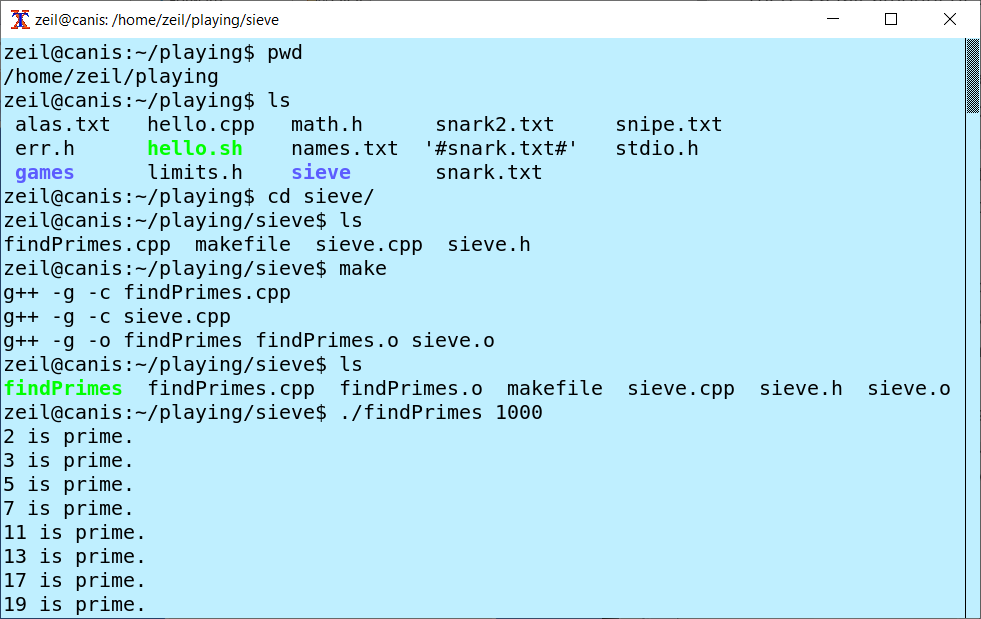
For about the first 2/3 of this course, we will be focusing on working from a Command Line Interface (CLI). CLI sessions will resemble the one shown to the right in which we type commands as plain text and receive our responses as text as well.
For the majority of incoming CS252 students, this will feel unfamiliar and maybe a touch archaic. We have all gotten used to operating systems that provide a graphic user interface (GUI) in which programs run in windows with icons, buttons, menus, etc. Most programs intended as consumer products for the general public follow that GUI style as well.
But this course is “Introduction to Unix for Programmers”, not for the general public. And command-line skills are essential for software developers.
1 Why CLI?
1.1 GUIs are expensive
The GUI layer of the typical operating system may add as much or more code as the entire rest of the operating system. Running that GUI consumes a significant portion of the CPU time and ties up a large portion of the system memory.
Many software products are now delivered as services “in the cloud”, meaning that they are actually delivered over the network from servers running on machines tucked away in some corner of the company, or on large server farms rented out by Amazon, Microsoft, Google, or other providers.
When you work with these kinds of servers, you want the machine to be lean and thrifty, with as much of the resources devoted to your software product as possible. We don’t put big GUI layers on these machines. That costs real \$\$, either because we are renting the server machines from someone and paying per CPU second or because, even if we own the server machines, we would need more of them the carry the same load.
For you personally, there is another expense to working with GUIs on remote machines. Text-based sessions like the one shown above can communicate quickly and effectively over even a slow home Internet connection. As we move to GUIs, trying to keep the graphics responsive when everything is being transferred to and from a remote machine is much more challenging.
1.2 GUI programs are inflexible
When you interact with a GUI-based program, you are limited to the capabilities for which its designers provided an explicit button, menu item, or other selectable element. In may cases the underlying code may have capabilities that can’t be touched through the GUI interface.
For programs with large numbers of settings or properties, it can be a real hassle to set up your preferred default settings. Then, if you encounter a task for which you need to temporarily change one of those settings, you need to dive into the settings menus (often several levels deep), make the change, run that task, and then remember to dive back into the settings menu and reset to your preferred default, lest you get caught by surprise the next time you use that program. By contrast, most command-line interfaces make overriding a default setting for one run a natural step.
GUI-based programs generally do not play well together. Two different GUI-based program may be able to exchange data, but only by manually using the menu of one to export its data into a common form, shut that program down, launch the second one, and use its menus to import that data.
Now, if that doesn’t seem so bad, imagine that it’s something that you do every day, or several times a day.
When processing files of text, in particular, command-line programs can be chained together and combined in a wide variety of fashions. Furthermore, we can save a series of text-based commands as a script, allowing us to run it as a single command, or to schedule it to be run automatically at different times of the day.
1.3 Command-line skills transfer into other applications
Now, there are GUI-based programs that allow you to script some of their actions. But they generally drop you into a scripting mode that looks a lot like an ordinary command-line session.
And most operating systems will allow you to schedule GUI-based programs to run automatically at different times of the day. But since you won’t be sitting at the keyboard and mouse to interact with the program, you would generally only do this with programs that, although normally GUI-based, can be optionally run from a command line, and you will usually need to understand its command-line options to do that.
Moreover, many of the basic skills you develop working at the command line are taken for granted in other applications. For example, very early in this course we will cover the ideas of file paths, both relative and absolute. Experience has shown that some of you will struggle with the concept of relative paths for a while. But the concepts of absolute and relative paths are fundamental to how web pages link to one another. You can’t build even a small website without understanding these. Similarly, if a program offers a scripting mode, you will probably need these same concepts to work within it.
2 The Shell Game
When you open a CLI, you usually see a largely empty screen/window. There may be a few lines of text identifying the machine you are on or the CLI program being run being run. At the bottom of whatever text is shown will be a largely empty line containing a simple prompt of some kind, often nothing more than a single > or $ character, followed by the cursor.
It is waiting for you to start typing in commands.
When you type in a command, whatever you type is read by a program called a command shell. The command shell looks at what you have typed and tries to interpret it as a command, then issues that command on your behalf. Any output from that command is typed into the CLI screen.
- Every operating system has a default command shell.
- Experienced programmers may install other command shells that they like better.
2.1 Try it out
Command-line sessions are not a specialty of Linux and other Unix variants. Your own PC has a command-line mode.
Throughout this course you will encounter sections labeled “Try This”. That means that I really want you to log in, try the commands or procedures I describe, and observe and think about the results.
If you don’t understand the output you receive, please post a question in the course Forum on Blackboard or send me your question via email.
And you should ask those kinds of questions before moving on to the following assignments.
- In fact, some of the assignments will check to be sure you have done the Try This assignments and will require that you do so before moving on.
2.1.1 MacOs
If you do not have access to an Apple OS/X or macOS PC, skip to the next section.
Example 1: Try This
- Open a
Terminalwindow on your Mac. usually you do this by clicking on the Search tool (magnifying glass icon) in the upper-right corner of the screen, and typing “terminal”.
You should see something similar to the session on the right.
Give the following commands (hitting the Enter key at the end of each one).
pwd
open .
open /Applications
ls /Applications
cd /Applications
pwd
ls
Try using the up arrow and down arrow keys. You should be able to move back and forth through the history of commands you have already tried out.
Use the arrows to revisit one of the
opencommands. Hit the Enter key to re-issue that command.Many command shells will offer to auto-complete file and folder names after you type a few characters.
Type
ls Docuand then hit the Tab key instead of Enter. The command shell should guess that you were on your way to typing “Documents”, and fill in the remaining characters for you. Hit Enter to issue the command.
Give the command
exitto close out this session.
2.1.2 Windows
If you do not have access to a Windows PC, skip this section.
Example 2: Try This
Open a CMD window on your Windows PC. (Click the Start/Windows button on the left end of the task bar and type
cmd, then hit enter.)Give the following commands (hitting the Enter key at the end of each one).
cd
explorer .
explorer Documents
dir Documents
Try using the up arrow and down arrow keys. You should be able to move back and forth through the history of commands you have already tried out.
Use the arrows to revisit one of the
explorercommands. Hit the Enter key to re-issue that command.Many command shells will offer to auto-complete file and folder names after you type a few characters.
Type
cd Docuand then hit the Tab key instead of Enter. The command shell should guess that you were on your way to typing “Documents”, and fill in the remaining characters for you. Hit Enter to issue the command.
Give the command
exitto close out this session.
2.1.3 Chromebook
If you do not have access to a Chromebook, skip this section.
Example 3: Try This
Having done this, you should see, among your apps, an icon labelled “Terminal” bearing a symbol that looks like this:
>_.Launch that app to open a Linux terminal window.
Give the following commands (hitting the Enter key at the end of each one).
pwd
ls /
ls /home
(Please note that the ‘l’ in “ls” is a lower-case “L”, not the numeric digit one.)
Try using the up arrow and down arrow keys. You should be able to move back and forth through the history of commands you have already tried out.
Use the arrows to revisit one of the
lscommands. Hit the Enter key to re-issue that command.Many command shells will offer to auto-complete file and folder names after you type a few characters.
Type
cd /hoand then hit the Tab key instead of Enter. The command shell should guess that you were on your way to typing “home”, and fill in the remaining characters for you. Hit Enter to issue the command.
Give the command
exitto close out this session.