

Version Control with git
Steven J Zeil
Version control tools help us keep track of the source code we write for out projects.
Version control has two major benefits.
- Version control is like a backup system on steroids.
- You can look back at old versions of your files, see exactly what you changed in each one and when you did it.
- You can restore old versions if you have messed things up in your current one.
- Version control is crucial when you are working on team projects.
Suppose that two programmers, working together on the same project, suddenly discover that they have both been editing the same file at the same time. Under ordinary circumstances, whoever saves their work first loses. That’s because the person who saves the file last will overwrite everything contributed by the first person.
Under version control, whoever saves first wins, and the person who saves second will be annoyed but will not risk losing their work. The version control system will realize that both programmers have been changing the same file, and will walk the second person through the process of merging their two sets of changes to the file.
In this class, we are going to focus on the first benefit of version control, which is useful even to programmers working on their own. using version control for collaborative work is covered in later courses such as CS350.
1 Repositories & Working Directories
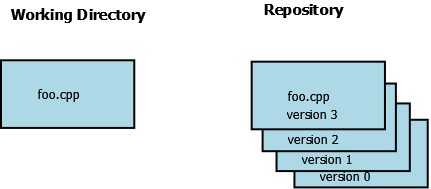
All version control systems start with the idea of a repository, a collection of versions of files that have been part of a project. If a project has 20 files, the repository will collect those 20 files. But as those files are changed over time, the repository will also remember the old versions of those files. If a file is removed/deleted from the project, the repository will still remember that file used to exist, and, if necessary, can retrieve it. If a new file is added to the project, the repository will know when it was added, and will not include it in any listings of prior versions of the project.
Programmers do not, however, edit, compile, or even read the files directly in the repository. Instead, programmers work on a copy of the files in their working directory. The working directory is just an ordinary directory like the ones you have been using all along.
We can think of the relationship between a file in the working directory and its equivalent in the repository like this:
and of an entire project like this:
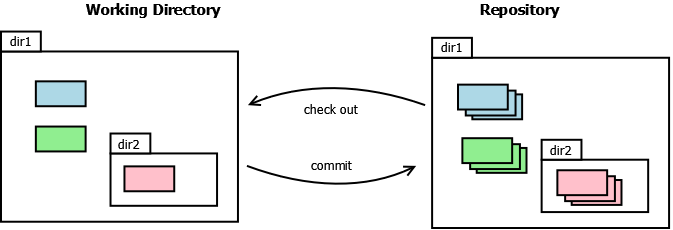
The repository knows what files are in the project and the directory structure that holds those files. But it keeps multiple versions of each file.
- When we send the current contents of a file to the repository, we say that we are committing our changes to the repository. The current contents of the file become a new version.
- When we ask the repository to give us a copy of a version of that file, we say that we are checking out that version of the file.
2 git
The version control system that we will be using is called git. git has a slightly more complicated model that what we have just looked at. The payoff for this added complexity is a lot more flexibility and better protection for your data.
2.1 Local Repositories & Origins
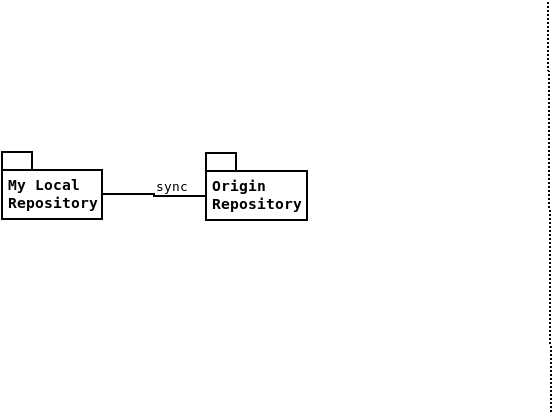
We usually have more than one repository. We work most closely with our local repository, which is tucked away in a directory somewhere near our working directory. But we can have other repositories as well. When working solo on a project, we will usually have a remote origin repository that we try to keep more or less in sync with our local repository.
- Because the origin repository is on a remote server somewhere “in the cloud”, even if our local PC were to crash and completely trash its hard drive, our project would survive.
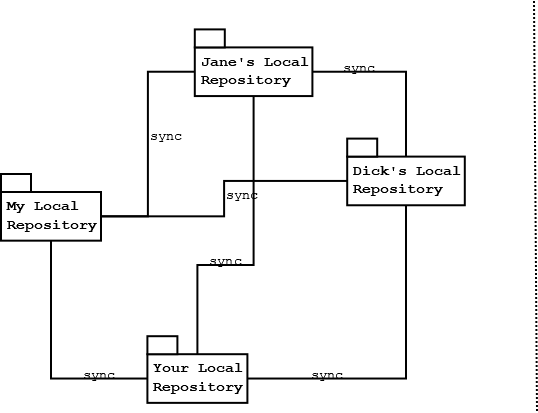
- If you are working in a team with other programmers, you can have multiple origin repositories, each of which resides on a different person’s PC.
- In essence, everyone’s repository is an origin to everyone else.
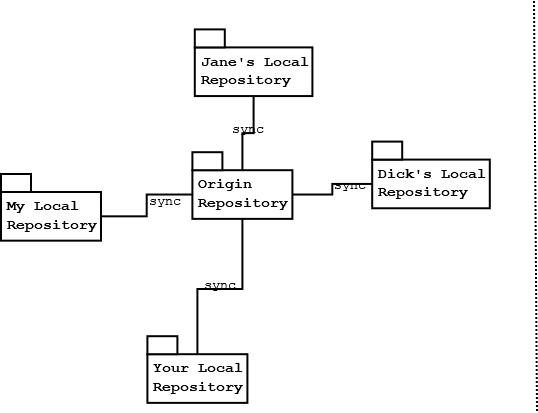
- More often, when working in a team, all programmers share a common origin repository on a remote server and each person keeps their own local repository synced up with that.
This is just less confusing overall.
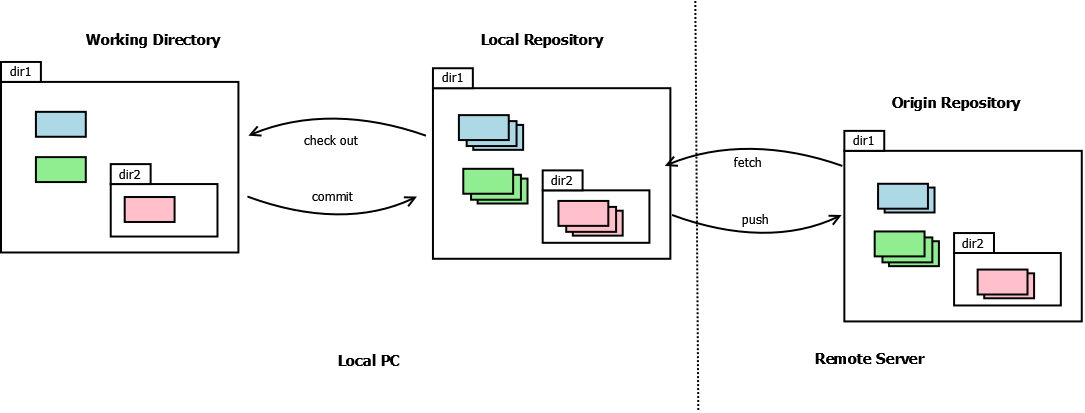
To keep the local and origin repositories in sync, we have to push our changes from our local repository to the origin and fetch changes anyone else may have made from the origin to our local repository.
Fetching changes simply updates our local repository – we don’t see those changes in our working directory (where we actually are doing all of work) unless we check out those changes into our working directory.
Usually, though, when we fetch changes we want to see them right away. So git has a shortcut operation called pull that combines a fetch and a check out.
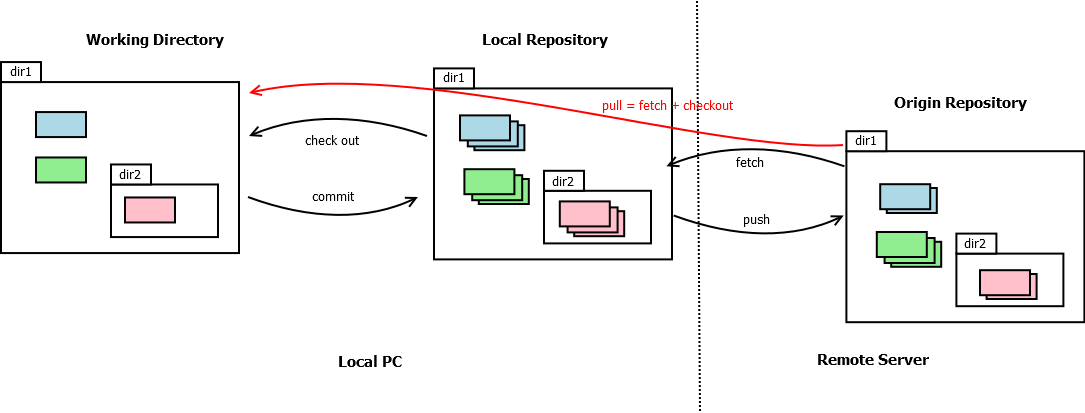
- As a daily user of
git, I almost always pull. In the last year, for example, I have done maybe one fetch instead of a pull.
2.2 The Stage
We don’t usually commit/checkout/fetch/push/pull individual files. Usually we send all of files that we have changed in our work session.
Occasionally, though, we might want to hold some of those files back.
For example, while trying to fix a bug, I might notice some misspelled words in the documentation. I fix those while I am working on the bug. But do I want to commit those together with my bug fix? What if my bug fix is wrong and someone decides to undo those changes? Do I want to lose the documentation fixes at the same time? It might make more sense to commit the unrelated changes in separate steps.
git supports this by inserting a stage (also called an index) between the working directory and the local repository.
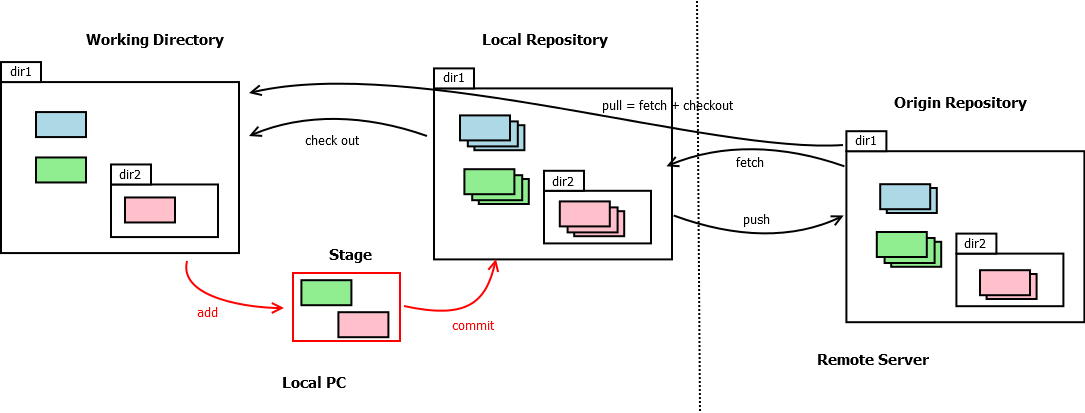
Now we commit from the stage instead of from the working directory. We choose the files that we want to include in the next commit by adding them to stage (also referred to as staging the files).
3 GitHub
Where do we keep the origin repository?
It could be kept on almost any SSH server, but the most popular approach is to use a version control service that combines storage for git repositories with project management support that, among other things, lets us control who is allowed to work with our origin repository.
The ODU CS Department, for example, runs its own GitLab, and these lecture notes that you are reading right now have been archived there since they were first written. Versions of this course can be recovered there going back many semesters.
By far the most popular version control service, however, is GitHub, which hosts over 200 million repositories. This is the service we will be using.
Example 1: Try This: Logging in to GitHub
Browse to https://github.com/ and sign up for a (free) GitHub account.
Log in at GitHub using your new credentials.
Before you can work with git repositories on GitHub, you will need a second way to identify yourself. Your login name and password will get you into the GitHub website, but when working with
gitoperations, you will need to use an SSH key.You may use your SSH key pair from this earlier exercise, or create a new key pair to use with GitHub.
- Log into GitHub.
- In the upper-right corner of the GitHub page is a small circle with an picture or icon. Click on it to drop down a menu and select “Settings”.
- Click on “SSH and GPG keys”.
- Click “New SSH Key”.
- Type an appropriate title - something you will recognize later.
- On your PC, open your public key in any text editor (e.g., NotePad on Windows or TextEdit on macOS).
- Copy and paste the entire text of the public key from the editor into the “Key” box on the GitHub page.
- Click the “Add SSH key” button.
4 Working with git and GitHub
4.1 Starting on a project.
There are two basic scenarios for start-up:
- You’re starting from scratch. You have no repositories. You might have a few files already squirreled away in a directory, but they aren’t under version control yet.
- You are joining a project that has already been set up, by your or by someone else. There’s already a repository on GitHub with one or more files. You need to make a clone of that project in your own directories.
4.1.1 Starting from scratch
There’s a few different ways to handle this.
I find it easiest to finesse this by asking GitHub to create the initial (origin) repository, then join that project from my local PC.
Example 2: Try This: Creating a Project on GitHub
Log into GitHub.
Click “Repositories”. Surprise! You don’t have any yet.
Click the “New” button.
- For the “Repository name”, let’s use “CS252-project1”.
Enter something appropriate into the “Description”.
Click “Private”. (You can change this later if you decide you are particularly proud of your work.)
Add check marks to the boxes “Add a README file” and “Add .gitignore”. * A drop-down box will appear beneath the .gitignore option. In there, select “Java”.
Click “Create Repository”.
You’ll now be taken to your new project page. You can see the file listing showing the two files that GitHub has set up for you.
Click on the file name to view the contents of the file.
You now have a project on GitHub that includes an origin repository with two files.
Next, you will create a clone of that project in your Linux account.
4.1.2 Cloning an Existing Project
When you want to work with a project that already has an origin repository on GitHub, you start by cloning that project.
The command to clone a remote repository is
git clone repositoryURL
where repositoryURL is an SSH URL describing where the origin repository lives.
Cloning creates a local repository and a working directory for you.
Example 3: Try This: Cloning an Origin Repository
Make sure that you have registered an SSH key with GitHub and have added that key to an SSH key agent.
Open an SSH session on one of the CS Linux servers:
ssh -A yourLoginName@linux.cs.odu.eduThe
-Aoption here is important. It means that, when you start to usegitcommands to talk to GitHub, any requests from GitHub to validate your SSH key will be forwarded back fromlinux.cs.odu.eduto your own PC.You must use an “ordinary” SSH session for this, not X2Go. X2Go does not support SSH key forwarding. You can, however, have X2Go running in one window for using editors and, in future lessons, IDEs, while you have an ordinary SSH session running in a different window.
If this is the first time you are using
giton this machine, you should tell it who you are. Give the commandsgit config --global user.name "your-real-name" git config --global user.email "your-odu.edu-email"
cdto~/playing.In a web browser, log into GitHub and go to your CS252-project1 page.
You’ll see a large green “Code” button. Click that to drop down a menu.
Under “Clone”, click SSH to see the SSH URL. Click the clipboard button to the right of that URL to copy it.
Back in your SSH session, type the opening part of the git clone command:
git clone…followed by a space. Then paste the URL you copied in the previous step. Hit Enter to issue the command.
In a few seconds, the command should exit. Do an
lsand you will see you have a new
CS252-project1/directory.If, when you issue the
git clonecommand, you are prompted for a login name/password to log into GitHub, you have a problem with your SSH key setup. Possible problems are:
- You didn’t register the public key with your GitHub account.
- You don’t have the private key active in an SSH key agent.
- You omitted the
-Aoption when starting your SSH session.Use Ctrl-C to cancel the clone command, try to fix your SSH issues, and try the clone command again.
Do
cd CS252-project1
ls -a
and you will see that you have copies of the
README.mdand.gitignorefiles that were created by GitHub. (The-aoption is necessary because file names that start ‘.’ are hidden in Unix by default.)Do
more README.md
more .gitignore
4.2 Working with Your Project Files
In your working directory, you can now use editors, compilers, and any of the conventional file manipulation commands we have studies to work with your files.
When you have reached a natural breaking point in your work or are about to pause for any length of time, you will want to commit your work.
The command
git status
will print a list of all files in your local repository that have been changed, created or deleted. It will also list which of these have been staged for the next commit.
- This status report will ignore files that are listed in your
.gitignorefile.
It’s not unusual to look at that list and wonder just what changes you’ve made to a file. The command
git diff path-to-file
will show you the differences between the current contents of that file and the last-committed contents.
When you are ready to commit, you start by adding changes to the stage. the command for this is
git add path-to-file-1 path-to-file-2 path-to-file-3 ...
You can add entire directories of files by giving the path to the directory.
When you have added everything you want to the stage (check this with git status), you commit your changes to your local repository with the command
git commit -m "Brief description of the commit"

Try to use appropriately helpful descriptions. You’ll thank yourself later.
Finally, you can send your commits up to the origin repository on GitHub with the command
git push
Example 4: Try This: Editing Files and Saving Your Work
Again, make sure that you have an SSH key that you have registered with GitHub and that you have added that key to an SSH key agent.
Open an SSH session on one of the CS Linux servers:
ssh -A yourLoginName@linux.cs.odu.eduand
cdto~/playing/CS252-project1.Give the command
git statusand verify that you have nothing waiting to be committed into your everything is up-to-date.
Add the files from this earlier Try This to your project directory.
ls ~/playing/withMake/
cp ~/playing/withMake/* .
ls
and build the program.
makeNow check your status again:
ls
git status
This time you will be informed of a number of “untracked” files. These are new files that
gitdoes not yet know whether we want to keep under version control.Did you notice that some files were not listed as untracked? The
.classfiles were not listed because your.gitignorefile includes the pattern:*.class. That tellsgitto ignore these files - we never want to track them in our repository. This makes sense because
- we can rebuild those files at any time by just issuing a
makecommand, and- those are binary files – version control usually focuses on the text files that make up our projects.
Use the
emacseditor to make a small change toPie.java– add a Java comment.Do
ls -a
git status
Notice the addition of the new file
Pie.java~.emacscreates a backup copy of files when you edit them, naming the backup the same as the original file except for a~at the end.We probably don’t want
gitto track backup files.Edit
.gitignoreand add this line at the end:*~Save your changes to that file, exit the editor, and do
git statusagain. Notice that
Pie.java~is no longer listed. But.gitignorenow appears in a list of files that are being tracked and that have been changed.Let’s commit these changes.
git add *.java makefile .gitignore
git status
The status should show that everything that has been changed will now be committed.
git commit -m "added source code"
git status
The status will now indicate that nothing needs to be committed, but will note that we are ahead of the origin repository by one commit, i.e., we have a commit in our local repository that has not been sent to the origin repository on GitHub.
git push
git status
And all should be well.
Go back to your web browser and look at your CS252-project1 page. Refresh the page if necessary.
You should see that there are now quite a few more files in the repository.
Congratulations! Your code is now safe “in the cloud”.
4.3 Time Traveling
git backs up the history of changes to our programming project.
But what can we do with those backups?
-
We can look back in time, and see what changes we have made and when we made them. (On team projects, we can also see who made them.)
-
We can replace any file with an older version if we desire. This frees us to try “risky” changes to our code, knowing that we can always roll back those changes if we decide we don’t like them.
The command
git log
lists the history of commits made in the project.
A typical output would look like:
$ git log
commit 1ebc175afe7cdb9116e6b735f5608a72cd2e7294 (HEAD -> main, origin/main, origin/HEAD)
Author: zeil <zeil@cs.odu.edu>
Date:   Mon May 10 11:44:11 2021 -0400

    added source code

commit 94acc28819d127fbb23a8dc76f7384a867e0a2e2
Author: Steven J Zeil <zeil@cs.odu.edu>
Date:   Mon May 10 11:28:50 2021 -0400

    Initial commit
Each commit is described by three lines of data, followed by the message that was used in the git commit command as the brief description of that commit.
-
In this example, there are two commits on the project. The older one was described as“Initial commit” and the newer one as “added source code”.
-
In the three lines at the beginning of each commit description, the 2nd and 3rd (Author and Date) are pretty self-explanatory.
-
The first line contains one or more identifiers for the commit.
- The first is a long hexadecimal number, sometimes called the commit’s hash. This is the most surefire way to identify a commit, but no one would want to have to type that long number into a command.
- Fortunately,
githas a rule that you only need to type as many digits as necessary to distinguish one commit from the others. - Most
gitusers will simply type the first 5 digits or so, e.g., 1ebc1 or 94acc. if that’s not long enough,gitwill tell you.
- Fortunately,
- “HEAD” is a shorthand name for the “current” commit in a repository. This is usually the most recent commit along some branch (a list of commits that lead from one to the next). In this course, we are only dealing with two branches, a list of commits called “main” in your local repository, and the matching list of changes called “main” in the origin repository.
- So the most recent commit can be identified as “1ebc1”, or as “HEAD” in the local repository, or as “origin/HEAD” in the origin repository.
- You can also refer to the most recent commit in a branch by the name of that branch.
- Because, in this course, we only have one branch in each repository named main, we can also refer to the most recent commit as “main” or “origin/main”.
- The first is a long hexadecimal number, sometimes called the commit’s hash. This is the most surefire way to identify a commit, but no one would want to have to type that long number into a command.
You can also use the git log command to list the history of changes to a single file.
git log path-to-file
Only commits in which that file was changed will be listed.
Example 5: Try This: Reading the logs
Again, make sure that you have registered an SSH key with GitHub and have added that key to an SSH key agent.
Open an SSH session on one of the CS Linux servers:
ssh -A yourLoginName@linux.cs.odu.eduand
cdto~/playing/CS252-project1.Give the command
git logto see the entire log.
Give the commands
git log README.md
git log makefile
git log .gitignore
The first will list only the initial commit, because you did not edit README.md after it was created.
The second will list only the “added source” commit, because makefile did not exist at the time of the initial commit.
The third one lists both commits, because
.gitignorewas created in one and edited in the other.
We’ve already used git diff to see what changes we have made since the last commit. But we can also list specific commits to see what changes have been made since that commit.
git diff commit-id
Example 6: Try This: What Has Changed?
Again, make sure that you have registered an SSH key with GitHub and have added that key to an SSH key agent.
Open an SSH session on one of the CS Linux servers:
ssh -A yourLoginName@linux.cs.odu.eduand
cdto~/playing/CS252-project1.Give the command
git logto see the entire log.
Write down (or copy) the first 5 digits of the identifier for your initial commit.
Give the commands:
git diff .gitignore
git diff HEAD .gitignore
git diff commit-id .gitignore
filling in or pasting the 5 digits you recorded earlier for the commit-id.
The first two commands actually mean the same thing. If we don’t give the command a commit-id, it defaults to HEAD.
The third command looks back at an earlier commit.
We can see a lot of the same information in GitHub.
Browse back to your project’s GitHub page.
Look for this
symbol (the number of commits will vary). Click on it.
This takes you to list of the commits that you have pushed to the origin.
Click on the message for the more recent commit. Now you can see a summary of what changes were in the last commit. A ‘+’ sign indicates a line that was added. A ‘-’ indicates a line that was deleted.
You have a lot of ‘+’ marks because most of what we did was to add new files. But look at the listing for
.gitignore. See how it focuses your attention on the specific changes that you made to that file?Use your browser’s back button to go bak to the list of commits. Click the message for the initial commit and see what changes were made then.
Go back to the list of commits again. Now click on the
<>symbol alongside the initial commit. This shows you the file listing back at the time of the initial commit.You’re looking back in time at your former directory.
Go back to your project’s home page by clicking on the project name
CS252-project1. Click on the file.gitignore.Click on the
symbol and you can see another list of commits. This time, however, you only see the commits in which that file was changed.
Repeat this step for some of the other files in the project.
You aren’t limited to merely looking back in time.
You can move backwards in time by checking out an older commit.
git checkout commit-id
This operation will replace the contents of your working directory by the contents it would have had at the time of that older commit. It leaves you in a bit of a strange state, however, where any new commits you make will not affect your main branch. So this is best used as a “look but don’t touch” way to explore the older code.
You can get back to your normal state by checking out the most recent commit in your branch:
git checkout main
Something that I use more often is the ability to rollback individual files to old versions:
git checkout commit-id -- path-to-a-file
This replaces the contents of that file as if you had simply edited to reverse all of the changes since that commit, but it leaves your local repository, as a whole, still in the HEAD state.
Example 7: Try This: Recovering old versions
Again, make sure that you have registered an SSH key with GitHub and have added that key to an SSH key agent.
Open an SSH session on one of the CS Linux servers:
ssh -A yourLoginName@linux.cs.odu.eduand
cdto~/playing/CS252-project1.Give the command
git logto see the entire log.
Write down (or copy) the first 5 digits of the identifier for your initial commit.
Give the commands:
git checkout commit-idfilling in or pasting the 5 digits you recorded earlier for the commit-id.
Do an
lsSee how many files have disappeared? That’s because we have reverted our project back to the time before we added all of the source code.
Undo that with
git checkout mainand do another
lsWhew, we didn’t actually lose our work after all.
Sometimes we make mistakes. Let’s make one now.
rm *.java
ls
Oh, that’s not good!
Let’s recover from our mistake.
git checkout .
ls
What a relief! (Why did we use ‘
.’? Remember that.refers to your current working directory. We cannot recover deleted files by saying “git checkout *.cpp” because those files are gone – the "*.cpp" won’t match files names that don’t exist. So, instead, we askgitto restore the current working directory, which in turn requires fetching the last know versions of those deleted files.)Let’s make a couple more changes.
Edit
PieSlicer.javaand change the line in themainfunction fromString title = "Pie";to
String title = "Cake";Edit
PieView.javaand change the name of the functionpainttodecorate.Let’s commit and push those changes:
git add *.java
git commit -m "I prefer cake."
git push
Now, suppose that we decide that we like the changes made to
PieSlicer.javabut that the change toPieView.javawas a mistake.Run
git log PieView.javato examine the history of
PieView.java. Write down or copy the first few digits of the commit identifier from before we added the comment.Do
git checkout commit-id -- PieView.javainserting the 5 digit commit-id you saved.
Do
more PieView.java
more PieSlicer.java
and see for yourself that the changes to one file have been rolled back, but the changes to the other are still in place.
Commit and push your changes:
git status
git commit -a -m "Reverting paint rename"
git status
git push
Here we have used a shortcut in the
git commitcommand. The-aoption tellsgitto automatically add/stage any files that have changed. So it saves us the need to run thegit addcommand. (This will not work with newly added, untracked files.)Take a last look at your project on GitHub.
Click on
PieSlicer.javain the file listing. Look at the upper right of the listing box for the “History” link. Click on it and compare to the changes we have been making.Do the same with
.gitignore.Click on “Insights”. Examine the “Network” report. It’s looking a bit more substantial.
On rare occasions, you may want to entirely abandon one or more commits and start working again from an earlier version. In essence, you can rewrite your history in this manner.
This should be used with extreme caution. The effects are permanent, making it one of the few ways that
gitwill allow you to lose changes that you have made.If you are working in a team with other people on the same project, doing this will break their own local repositories and may cause them to lose the code they have been working on.
If you are using git to submit homework in a class, doing this will likely break your instructor’s clone of your project, and you will likely be graded on an older version of your code.
Remember that the HEAD is a marker telling git what is the most up-to-date commit in the repository.
You can move the HEAD marker to an earlier version using the git reset command.
git reset --hard commit-id
marks the indicated commit as the new HEAD of the current branch. You can then do
git checkout HEAD
to check out that older version.
5 GUI Interfaces to git
You’ve now seem quite a few git commands, and you might be wondering if there are ways to do all of this via a GUI (graphic user interface) rather than the command line.
GUI interfaces to git do exist. But few of them are good enough to completely replace the CLI git commands. And most are limited to repositories on your local PC, and will not help with repositories on remote Linux machines.
That said, in the next section on IDEs, we will see that the recommended IDEs have some integrated support for git. I generally find that far more useful than running a separate program to monitor my git repositories.
Even those, however, are unlikely to completely replace the command line.
6 Summary of git Commands
6.1 Basics
git cloneURL- Make a local clone of a remote repository.
Note: GitHub will offer you a selection of different URLs. Use the SSH URL. The HTTPS URL is deprecated (discouraged and subject to removal at any time) by GitHub and only gives you a copy of the repository that you can read but not update with changes.
git clone URL directory : Like the prior command, but allows you to specify the name of the directory that will hold the new clone.
git config --global user.name“your-real-name”- Sets the name that will be associated with your git commits.
Particularly important for group projects.
git config --global user.email“your-odu.edu-email”- Sets the email address that will be associated with your git commits.
Particularly important for group projects.
git status- Shows the status of your local repository, including whether you have files that need to be committed and commits that need to be pushed.
git addpath-to-file1 path-to-file2 path-to-file3 …- Adds the listed files to the stage. If a path to a directory is given, all files in that directory are moved to the stage.
git commit -m“message”- Commits all files on the stage, saving a permanent snapshot of thos files.
git commit -a -m“message”- Like the previous command, but first automatically adds modified (but not new) files to the stage
git push- Send any commits on the local repository to the remote repositry (e.g., GitHub).
git pull- Get any commits that someone else (or you when working on a different machine or in a different directory) have previously sent yo the remote repository.
If you are working on a team, it is important that you do this command whenever you start a new work session.
6.2 Going Back in Time
git log- Prints a list of your past commits.
git logpath-to-file- Prints a list of your past commits that included changes to the indicated file.
git diff- Shows what changes, if any, have been made since you last committed.
git diffpath-to-file- Shows what changes, if any, have been made to a file since it was last committed.
git diffcommit-id- Shows what changes, if any, have been made since that prior commit.
git checkoutcommit-id- Check out the entire project as it existed dring that commit.
This is useful for examining old changes, but leaves your working directory in an unbusuable state. Do
git mainto restore it. git checkoutcommit-id--path-to-file- Replace the indicated file by the contents it had as of that prior commit. The rest of your wroking directory is unchanged.
Use this to retrieve an old version of a file when you decide that your recent changes were a mistake.