

Installing CygWin with OpenSSH
Steven Zeil
Last modified: Aug 27, 2023
Contents:
1 Installing CygWin
- Visit cygwin.com and get the installer program. Run it.
- You can click
Nextand accept the default values up until the screen that asks you to select a mirror (download site). I recommend selecting something nearby, such as http://mirror.cs.vt.edu/ to get good download speeds. - After that, you will be asked to select packages that you want to install. the core components of CygWin will already be selected. We’re going to add to that.
Change the View to “Category”, expand the “All” category, then the “Net” category, and scroll down to “openssh”.
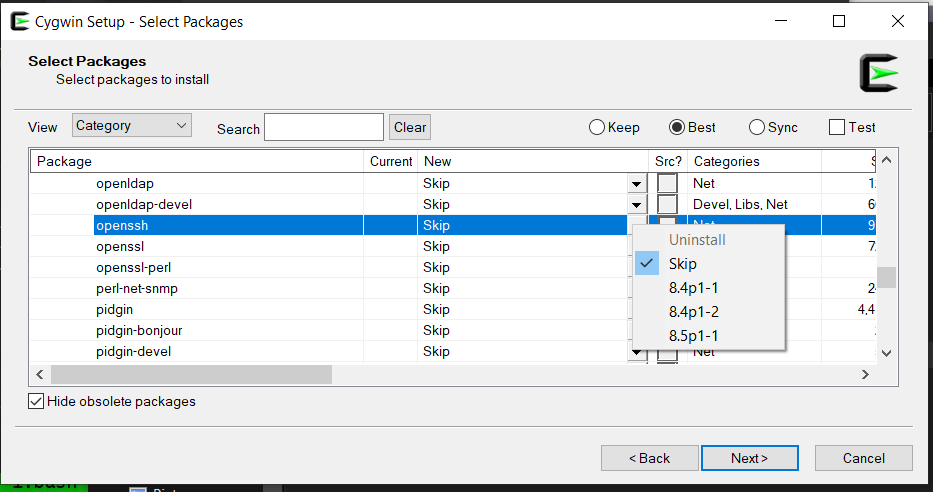
Click on the “Skip” entry and select the latest (largest-numbered) version.
-
Continue on clicking
Nextuntil you come to the screen with the Finish button. Put a check mark by “Add icon to Start menu”, and click Finish.
2 Running CygWin
You will now have a “CygWin Terminal” entry in your Start menu. Run this to launch a CygWin session.
Things you should know:
- Type “exit” to close the session.
- In this session, you can issue most of the commands that you will be learning about in this course.
- Commands issued in a CygWin session follow Linux conventions rather than Windows ones. In particular
- Paths to files use forward slashes (‘
/’) rather than baskslashes (‘\’). - You can still access all of the files on your Windows PC from the CygWin terminal session. Your
C:drive in CygWin is known as/cygdrive/c, yourD:drive is/cygdrive/d, and so on.
- Paths to files use forward slashes (‘
- You can rerun the CygWin setup program to add additional Unix commands/programs (e.g., the
g++compiler for C++). - Once a month or so, I recommend rerunning the setup program and just clicking through on
Nextand thenFinish. This will pick up and install any updates that have been issued for the Unix packages you have installed.