

SSH Keys
Steven Zeil

How do you prove you’re who you say you are when you are online?
How do you prove you’re allowed to access your online account?
This is the problem of authentication, the action of verifying the identity of a user.
So far, we have relied on login credentials – a combination of a login name and a password. Passwords have been the primary form of online authentication (proving you are allowed to take some action) for a long time. But they have their problems. Passwords can be hacked, by brute force or by clever guesswork, and attempts to make them harder to hack also make them harder to remember and to type.
In this lesson, we will look at SSH keys, a component of public key cryptography, as an alternate means of accessing your account.
1 Cryptography: a Bit of Background
1.1 Ciphers
Hiding messages in secret codes has a long history. Julius Caesar encoded his private correspondence using a letter-shift technique in which each letter of his text was replaced by a different letter $k$ steps away in the alphabet. If we treat the letters of the alphabet as numbered 0..25,
| a | b | c | d | e | f | g | h | i | j | k | l | m | n | o | p | q | r | s | t | u | v | w | x | y | z |
|---|---|---|---|---|---|---|---|---|---|---|---|---|---|---|---|---|---|---|---|---|---|---|---|---|---|
| 0 | 1 | 2 | 3 | 4 | 5 | 6 | 7 | 8 | 9 | 10 | 11 | 12 | 13 | 14 | 15 | 16 | 17 | 18 | 19 | 20 | 21 | 22 | 23 | 24 | 25 |
then we are basically replacing a letter whose number is $x$ by the letter numbered $(x + k) \mod 26$. For example, if our “key” $k$=2 e.g., we replace ‘a’ by ‘c’, b’ by ‘d’, ‘c’ by ‘e’ , … ‘x’ by ‘z’, ‘y’ by ‘a’, and ‘z’ by ‘b’. This substitution is easily reversed by the recipient of the message, so long as they know the key value.
This is a special case of what is called a substitution cipher, in which each letter is replaced by another according to some rule shared by the author and the reader of a secret message. Substitution ciphers that always replace a letter by the same replacement every time it occurs can be broken fairly easily without knowing the replacement rules. In fact, many newspapers still run a daily “cryptogram” puzzle.
To make substitution ciphers unbreakable, we need to continuously vary the substitution rules. For example, we might have a key text such as a passage from Shakespeare,
“Friends, Romans, countrymen, lend me your ears!”
and use the numeric value of each successive letter in the key text as the next value of $k$. So, if our secret message starts with “Aah! An aardvark…”, we would replace the first ‘A’ (1) by letter ‘G’ ($1+5$ , the $5$ coming from the ‘F’ in “Friends”), then replace the second ‘a’ (1) by letter ‘s’ ($1 + 16$, the 16 coming from the ‘r’ in “Friends”), then replace ‘h’ (7) by ‘p’ ($7 + 8$, the 8 coming from the ‘i’ in “Friends”), and so on. If our message is longer than our key text, we simply start over from the start of the key text.
As long as the key text is kept secret and is long enough, this code is virtually uncrackable.
1.2 Key Exchange
The weak spot in this approach to secrecy is that both the author and the reader of the message need to have access to the secret key. At some point in time, they needed to exchange the key text between them. As numerous spy novels and films have attested, if you can intercept that exchange of keys, you can decode their messages. You can even craft messages of your own, pretending to be one of them.
1.3 One-Way Functions
The ciphers we have described so far use calculations that are easily reversible. To encode a message $m$, we compute $(m + k) \mod 26$. To decode it, we compute $(m - k) \mod 26$. Most simple, familiar mathematical functions are easily reversible by applying an inverse function, addition’s inverse is subtraction, multiplication’s inverse is division, etc.
Sometimes the inverse of an action is a bit harder to compute than the original. A square and a square root are inverses, but it’s considerably easier to compute $x^2$ than to compute $\sqrt{x}$.
There are, however, some functions that are effectively one-way. We can compute the function in one way with relative ease, but would need massive arrays of CPUs running for extensive amounts of time to compute the inverse.
For example, suppose I give you two prime numbers $m$ and $p$ and ask you to compute their product. Not hard. Even if the numbers are quite large, you can certainly write a computer program to do this calculation in under a millisecond.
But suppose I give you a number $n$ and tell you that it is the product of two primes, and ask you to find those two numbers. If I give you a small, number, say, $n = 33$, you could rapidly tell me that my two prime numbers were $3$ and $11$. But that if I gave you a larger value, say, $n=58183$? That’s surprisingly difficult. 1
And it’s not just difficult for humans, either. If I were to randomly choose a pair of prime numbers that were thousands of digits (or bits) long, computing this inverse function is prohibitively time-consuming, even for the fastest computers.
1.4 Public Key Encryption
One-way functions form the basis of modern electronic cryptography. They can be manipulated to allow for public key encryption, in which we have two numbers, one of which can be used to encrypt messages, and one which can be used to decrypt them, but neither number can be feasibly computed from the other number.
This goes a long way towards solving the key exchange problem. We release the encrypting number as a public key, but tell no one the private key number we will use for decrypting. Anyone can encrypt messages to us that only we will be able to read.
We can even turn this around. If we generate another public-private key pair and release the decrypting one publicly, we can send out encrypted messages that anyone can read, but that only we could have written. We can actually prove to people that a message came from us. (This gives rise to the idea of a digital signature.)
And that means, even if we have no particular interest in hiding our messages, we can use this same technology for authentication, to prove that we are who we say we are, and that we are someone who is allowed to log into a particular account on a remote computer.
1.5 Authentication
Public key encryption can be used for the purpose of authentication. An account holder registers or authorizes a copy of a public key on a remote server, and retains the private key on his or her local PC. When that person attempts to log in to the remote machine, the two machines use the keys to verify the identity of the person logging in.
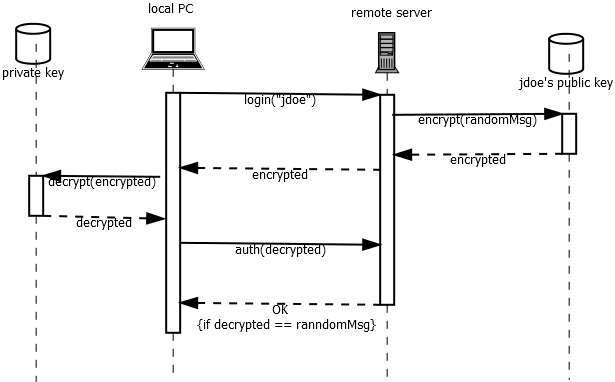
One way this can work is illustrated here.
- Someone sitting at the local PC tries to log in to the remote server using the login name “jdoe”. The local PC sends this request to the remote server.
- The remote server generates some kind of semi-random message (e.g., the login name “jdoe”, the time of day, and a randomly generated string), and uses
jdoe’s public key to encrypt that message. - The remote server sends that encrypted message back to the local PC.
- The local PC uses the private key to attempt to decrypt the message.
- The local PC sends the decrypted message back to the remote server, asking to be authenticated.
- The remote server compares the decrypted message to the one it had originally generated. If they match, the remote server knows that the local PC has access to
jdoe’s private key, and accepts that as proof of that the person trying to log in really does own thejdoeaccount.
How does this compare to login/password from a security standpoint?
-
Conventional password authentication bases its security on
-
the user’s ability to remember (or crack) the password.
-
-
Public key authentication bases its security on
- Physical possession of a device containing the private key.
- The ability to log into that device.
- This is probably based on passwords or fingerprint sensors, but, in general, we have to be a little bit suspicious of how well people protect their personal devices.
- In addition, the form of public key authentication that we will use, SSH keys, adds a passphrase control to the private key itself, for another layer of security.
2 SSH Keys
SSH keys are a form of public key authentication designed for use when logging in to SSH servers. They are useful enough, however, that they crop up in a lot of web-based applications as well.
2.1 Creating an SSH Key Pair
The first step in using SSH keys is to create an SSH key pair. It’s a “pair” because you will wind up with two files, one containing the public key and the other containing the private key. At the end of the process, you will put the public key on one or more remote machines, but keep your only copies of the private key on devices that you physically own and that you control access to.
In theory, you can create the key pair on your local PC and then transfer the public key to a remote server, or create the key pair on the remote machine and transfer the private key back to your own local PC, deleting it from the remote machine. Either way you wind up with the public key on the remote machine, and the private key on your local PC.
For simplicity, I’m going to describe the latter approach, because it avoids issues that can arise from competing formats used for public keys.
Example 1: Try This: Creating an SSH Key Pair
To generate a key pair, log in to a CS SSH server and give the commands:
ls -ld ~/.ssh
mkdir ~/.ssh   # if you don't already have this directory
chmod 700 ~/.ssh
cd .ssh
ssh-keygen -b 521 -t ecdsa
You can change the name of the generated files if you like. (I keep different key pairs for different client machines and name them accordingly, e.g., “officePC”, “homePC”, etc.). Do keep it in your
~/.sshdirectory, however.You will be prompted for a passphrase. This is used to protect your private key in case someone gains access to the machine/account where you have it stored.
- Do choose one. Even though the command prompt from
ssh-keygensays it’s optional, you don’t want to have an unprotected private key around.- Most people use much longer passphrases than a typical password, but generally place less emphasis on odd character substitutions that make the phrase harder to type.
Now look in your
~/.sshdirectory. You should see your new keys. One file has the extension “.pub”. That’s the public key. The one with no extension is the private key.You can do a quick test of your key pair by giving the command
ssh-keygen -y -f path/to/your/private-keyThis command will prompt you for your passphrase and, if you are successful in providing it, will then print the corresponding public key.
Compare the output of that to
cat path/to/your/public-keyThey should match except possibly for the little “
usr@machine” comment at the end indicating the machine on which you created the key.Remember, the idea is that you want the public key to be on the remote server and the private key on your local client.
Since you have just created both keys on one machine, one of them is currently out of place.
Transfer the private key to a convenient directory on your local PC, and delete the original private key from the remote server.
Where should you put the private key on your local PC? I recommend emulating the Linux practice and storing it in
~/.ssh/, creating that directory if it does not already exist.
- For Windows users, you can’t use
~directly, but remember that~in Linux is a shorthand for your home directory, which in Windows is known as%HOME%and is found inC:\Users\yourWindowsLoginName\. So put your private keys inC:\Users\yourWindowsLoginName\.ssh\.
2.2 Authorizing Keys
At this point, you should have
- A copy of the private key on the local client.
- A copy of the public key on the remote server.
But just having the public key on the remote server isn’t enough. We have to authorize that key before it will do anything for us.
We authorize the key by providing the public key to the server that you would like to gain access to.
Let’s authorize this key as one that you can use to log in to your CS Linux account.
On Linux servers, you do this by adding the public key to ~/.ssh/authorized_keys. authorized_keys is simply a text file that contains a list of public keys.
Example 2: Try This: Authorizing an SSH Key
On a CS Linux server, add the public key (which should already be on that remote server) to
~/.ssh/authorized_keys.There’s at least two ways to do this.
You can simply attach it to the end of the
authorized_keysfile:cd ~/.ssh touch authorized_keys cp -a authorized_keys authorized_keys.bak cat path/to/your/publicKeyFile >> authorized_keysThis works the first time you install a key. But if you need to replace or modify a key, it’s not reliable, because you would wind up with multiple copies of the same key in your
authorized_keysfile, leading to unpredictable results.Alternatively, open
~/.ssh/authorized_keysin your favorite text editor and add the public key to the end. (This is also how you can clean up this file later if you want to remove a key, e.g., because the key doesn’t work properly or if you lost the private key file or forgot its passphrase.)
If you are replacing a key, be sure to delete the old entry for that key. If you have entries in there for keys you aren’t using, remove those as well.
Now, let’s try it out.
Back on your client machine (your local PC), connect to the server:
cd directory/containing/your/PrivateKey
ssh -i pathToYourPrivateKey -o "IdentitiesOnly=yes" yourCSLogin@linux.cs.odu.edu
If you are on a Windows PC and have been using PuTTY instead of OpenSSH, it’s time to change.
- If your PC is too old to run OpenSSH, your best recourse is to run some form of Unix emulation.
The -i option tells the
sshcommand which private key to use. Note that this is a path to a file on your local PC.
- And if you are in Windows, using either the CMD shell or Powershell, remember that directories are separated in paths by
\and not by/.- The
-o IdentitiesOnly=yestellssshto not even try normal passwords. Since we are trying to prove that the key has been authorized, we don’t want to get distracted by successful logins that use a different method. (This doesn’t always work. I seem to often get asked for a password anyway.)Instead of your usual password prompt, you should instead be prompted with:
Enter passphrase for key...Go ahead and enter the passphrase you used to create the key pair.
You should then find yourself logged in to the server.
Troubleshooting
If you run into problems with the final step above…
- Review your steps. Make sure that you have the correct files on the correct machines.
Remember, the public key goes on the remote server inside the
authorized_keysfile.The private key goes on your local client machine.
That means that when you are giving a path to your private key in an
sshcommand, it must be a path on your local machine.
- If you are having problems figuring out the correct path to your key on your PC, try
cding to the directory containing your key before giving thesshcommand. That way. the relative path to your key is simply the name of the key file.
Check your permissions on the server very carefully. You should have the equivalent of:
  chmod 701 ~
  chmod 700 ~/.ssh
  chmod 600 ~/.ssh/authorized_keys
You may also need to check the permissions on your private key on your local client. Some versions of
sshwill refuse to use a private key that is readable by anyone other than you (the owner of the file).In particular, if you get a message complaining that your private key permissions are too open, change the permissions on that key!
chmod 600 path-to-your-private-key
- If you are using the WSL (Bash/Ubuntu) on Windows, you may find that
chmodcommands like the one above are ignored. (Do an “ls -l…” to check.)You may find that you need to copy the key into the WSL file system. Put it in
~/.ssh/instead of in/mnt/c/Users/yourWindowsName/.ssh/.If you are running the older WSL1, you may be able to make
chmodwork by using an editor:sudo nano /etc/wsl.conf and adding the lines [automount] options="metadata" Then close all open bash instances, restart bash, and see if your `chmod` commands now work.
3 Key Agents
Wait, did we just make your life harder?
Now, you may wonder what good that was. Every time you try to log in to a CS Linux machine, you will be prompted for that passphrase, which is probably much longer than your old password.
But usually, we don’t activate the private key for a one-shot login. Instead, we run a key agent on our local client machine. We tell it to activate our private key (giving it the passphrase to prove that we are its owner). It then watches for subsequent SSH connection attempts and offers up the activated private key.
3.1 Starting an Agent…
3.1.1 …on Windows 10 Machines with the OpenSSH Client
If you are running Windows and use the OpenSSH client, you must start the agent as a Windows service. This means that it will run each time you log in on that PC.
In the taskbar search area, type “services”. Select the “Run as administrator” option.
- Find the “OpenSSH Authentication Agent” service.
- Right-click on it and select Properties.
- Set the “Startup type” to Automatic.
- Click the Start button to start the service.
- Click OK and exit Settings.
Your key agent service will now run whenever you are logged into Windows.
3.1.2 …on MacOS
The SSH Agent is an integral part of the Mac operating system, being a component of the “key ring”. It should be running whenever you are logged in to your PC.
3.1.3 …on CygWin & Linux
Create an agent using the ssh-agent command.
On your local client PC, give the command
eval `ssh-agent`
This launches a new key agent and tells it to watch for incoming requests to validate that private key.
3.2 Adding Keys to the Agent
Your agent is running, but it has no idea what keys you want it to use when you try to connect to remote servers.
You need to add keys to the running agent.
In the CLI on your local PC, give the command
ssh-add -t 60m path-to-your-private-key
(If you are using Windows OpenSSH, omit the “-t 60m”, as this option is not supported.)
-
You might be asked immediately for your passphrase, or you might be asked for it the first time you try to use that key to connect to a remote server.
-
If you have a problem figuring out what the appropriate path is on your local PC, try
cding to the directory where you stored your private key before typing this command. Then the only thing oyu need for the correct relative path is the name of the file.
The “-t 60m” puts a time limit (60 minutes) on how long the agent will continue offering that key. When the time limit expires, you will need to add the key again.
- This is an important safeguard if your PC is not physically secure – if you are in a situation where someone else (strangers, roommates, siblings, etc.) might have access to your PC if you step away from it.
- You can change the number of minutes up or down as you see fit. If you are absolutely certain that your PC is secure, you can even omit the time limit altogether.
You can get a list of all the keys being offered by your agent with
ssh-add -l
You can remove a key from the agent, so the agent will stop offering it, with
ssh-add -d path-to-your-private-key
This does not delete your key file. It merely tells the agent to stop offering up that key.
You can remove all active keys from the agent with
ssh-add -D
This is a good idea, again, if your PC is not physically secure and you need to leave or are finished with a work session, particularly if you added your keys with a very long time limit (or no time limit at all).
3.3 Try It Out
Example 3: Try This: Logging In with An Agent-Managed Key
- Start an SSH agent on your PC, if you have not already done so.
- Add your private key to the agent.
- Now try logging in to a remote server:
ssh yourCSLogin@linux.cs.odu.eduIf you were not asked for your passphrase when you ran
ssh-add, you should be asked for it now.After successfully logging in to the remote server, log out (
exit) and then give the samesshcommand again. This time you should be logged in without needing to type a password or passphrase.
From here on, it is up to you if you prefer to continue using your login name/password with your SSH sessions or to switch to using your SSH key instead.
Unfortunately, X2Go does not currently work with the Windows SSH key agent, so you are better off sticking with login name & password for X2Go sessions.
In the next lesson, we’ll see another application for SSH keys.
1: In case you’re wondering, $58183 = 83 * 701$.