

git: Beyond the Basics
Steven J Zeil
This lecture covers some aspects of git that aren’t required for CS252, but may be needed in later courses. In particular, we’ll look ath git abilities aimed towards working in teams.
1 Branches
Branches are critical to using git in team projects. They can be useful in solo projects as well.

So far, we have considered the series of changes made to our code as a simple, linear, history. We can move forward or backwards along this straight line to revisit older or newer versions of our code.
Suppose, though, that we have worked through a few revisions and then get an idea that might not pay off.
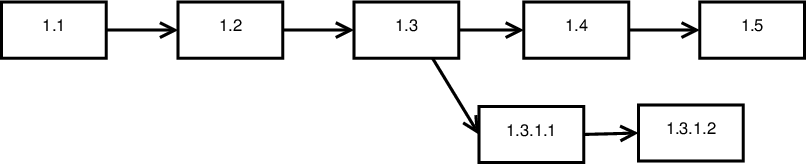
We can start a branch to explore our idea while others continue work on the main trunk. A branch is a new line of revisions that can be advanced independently of the main sequence of code revisions.
The VCS will provide commands that switch our working directory from one branch to another.
While we are working in our new branch, other members of our team can proceed to work on and commit changes to the original, main branch.
Example 1: Try This: Branching
Make sure that you have an SSH agent running and that your GitHub ssh key is loaded.
ssh-add -l
cdto~/playing/CS252-project1, your repository from the earlier Try This exercises.Check with
git statusto be sure that all changes to your files have been committed.
List the branches with the command
git branchThis will list branches in your local repository only. You should only have one,
main.Now try
git branch -aThis will list branches on both your local and remote repository. You should see that you have one local branch and one origin branch, named “main” and “origin/main”, respectively. There will also be a line indicating that the origin’s HEAD (an indicator of which is the main branch in the repository) is origin/main.
Let’s create a new branch with
git switch -c myBranchor, on older versions of
git,git checkout -b myBranchNow give the
git branch -acommand and you will see that you have a new local branch, though it does not yet exist on the remote origin.
Give the command
git statusand confirm that your are currently working in your new branch.
Edit the
README.mdand change the last line to “a small project with a branch”.Commit your change:
git add README.md
git commit -m "in a branch"
You can hop back and forth between branches, and
gitwill keep the appropriate file contents available.cat README.md git checkout main cat README.md git status git checkout myBranch cat README.md git statusYou should see that
gitis actually tracking two different sets of content for you, depending on which branch you have most recently checked out.You should now be in myBranch. A check of
git statuswill indicate that you have an unpushed commit. Try to push it:
git pushYou will get an error message indicating that myBranch “has no upstream branch”. In other words, myBranch exists in your local repository , but not in your remote origin repository. It will then suggest the longer command necessary to establish that branch in the remote origin.
Copy and paste that suggested command to push your new branch.
1.1 Merging
If the idea in the branch does not pay off, the branch can simply be abandoned.
If you decide to adopt the changes in the branch, you can elect to merge it back into the trunk.

After a merge
-
We might opt to discontinue using the branch
-
Or we might continue working along it, eventually generating more changes to be merged into the system

Example 2: Try This: Merging
Make sure that you have an SSH agent running and that your GitHub ssh key is loaded.
ssh-add -l
cdto~/playing/CS252-project1.Switch back to your main branch
git checkout mainEdit the file
progA1.h, adding a new line that reads:// a comment in the main branchCommit this change.
git commit -a -m "Added a comment to progA1.h"Let’s check our two files:
cat README.md
cat progA1.h
Then merge myBranch into main:
git merge -m "merging" myBranchVerify that you are still in the main branch.
git statusBut then look at the files:
cat README.md
cat progA1.h
You will see that the changed content from myBranch has been copied into main.
Your myBranch still exists:
git checkout myBranch
cat README.md
cat progA1.h
and was not affected by the merge.
You can get a picture of what you have accomplished:
git log --graphwhich shows clearly that you have two branches that have been merged. Note the placement of the labels “main” and “myBranch”. These indicate that the merged commit is in main but not in myBranch.
Save your changes by pushing both branches:
git push --all
1.2 Merge Conflicts
Any merge (including the implicit merge that occurs when you pull) has the potential to detect conflicts in which changes are made in two different branches to the same file.
In fact, conflicts are much more likely during merging than during normal commits, simply because merging typically deals with changes from multiple commits at one time.
If you go too long before merging, you risk winding up in merge hell, faced with massive amounts of conflicting code.
1.2.1 Avoiding Merge Hell
The simplest way to avoid merge hell is to never go too long between merges.
Don’t let days worth of coding pile up before you merge your branch back into the main one. Decide whether you are keeping this branch or not and either abandon it or merge it as soon as possible.
1.3 Resolving merge conflicts.
When a conflict is detected, git will write both sets of changes into the file, looking something like this:
for (int i = 0; i < n; ++i)
{
<<<<<<< branch 1
    a[i] = a[i] + 1;
============
    a[i] = b[i];
    ++a[i];
>>>>>>> branch 2
}
The <<<<<<< and >>>>>>> indicate the beginning and the end of an area containing two conflicting changes. The ============ separates the two conflicting versions.
To resolve the merge conflict you must
-
Edit the file. Search for
<<<<<<<to find each marked conflict.Think carefully about whether you want to keep one version or the other or whether you need to use your programming skills to combine them somehow.
Make your changes, removing the
<<<<<<<,>>>>>>>, and============lines as you do. -
Save your changes and add the repaired file to the
gitstage. - Commit your changes.
1.3.1 Merge Conflicts and IDEs
IDEs can help with that process. Both Eclipse and VSCode will flag the files that contain conflict markers. Both of them have special editors that will allow you to view the conflicts and select the version of the text that you want to keep.
-
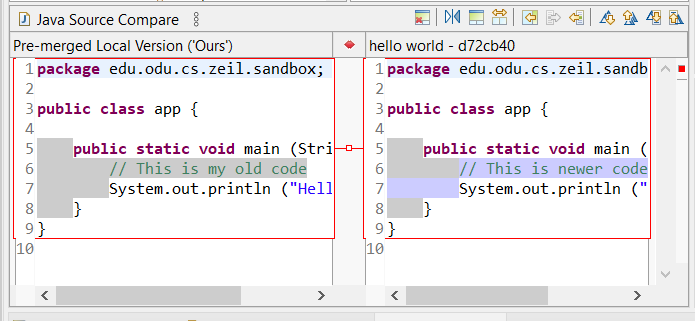
In Eclipse, right-click on that conflicted Java file and select “Team” $\rightarrow$ “merge tool”. You should see both versions side-by-side, with the two distinct comment lines flagged as a problem.
The column on the left shows your current version.
Hover over the small buttons in the upper right. You will see that one allows you to copy the changes from the right column to overwrite the ones selected in the left. Others allow you to move from one conflict block to the next.

-
In VSCode, view the list of conflicts in the git/source control view. Click on the conflicted file name to open the difference editor.
Scroll down to where the conflict is displayed. You will see that you have options, displayed at the top of the conflicting block, to accept either the “current” or the “incoming” change.
Once you have selected the code you want to keep, save your file.
Repeat this process for all files with conflicts, then commit and push your changes. This will resolve the conflict.
2 Tags
Tags are human readable labels that serve as a name for a commit.
A common use for tags is to mark “release versions” of a program such as “v1.0.0”, “v1.2.0”, etc.
You can list all of the tags in a repository with
git tag
2.1 Adding a tag
You can add a tag to your current commit with the command
git tag -a -m message tagname
For example
git tag -a -m "first public code release" v1.0.0
Tags are not automatically pushed from your local repository along with normal commits.
Instead, you give a variant of the push command:
git push --follow-tags
2.2 Moving a Tag
Sometimes you discover that you put a tag on the wrong commit. You cna reassign a tag to a different commit by adding -f (for “force”) to the tag command:
git tag -f -a -m message tagName
If you have already pushed the incorrect tag to the remote repository, update it like this:
git push -f --tags
2.3 Deleting a Tag
You can remove a tag from your local repository with -d:
git tag -d tagName
Removing it from the remote repository, if you have already pushed it, is trickier.
git push origin :tagName
Literally, what this does is to push the particular commit known to the remote repository (origin) as tagname. The pushed information will include the fact that tagName no longer applies.
3 Collaboration: Using git to Work in a Team
3.1 The Simple Case: everyone working in the main/master branch.
The essential discipline for collaborating with other people who share the same origin repository is summarized as:
- Start every work session with a
git pull. - Do your work.
- End every work session with a
git commit.- If the code you have committed will not break your teammates work, then follow that with a
git push.
- If the code you have committed will not break your teammates work, then follow that with a
Never let your work pile up for days without pushing.
- Working on your own without letting your teammates see and use your code isn’t collaborating, it’s obstructing.
3.2 Larger projects: Everyone works in their own branch
On larger projects, teams will agree to a discipline where each programmer works in their own branch(es) and merges their content into the master only after specific conditions have been met.
In this approach, each team member’s branch may last a long time. Over time, a long-running branch can get so far out of sync with changes being made by your teammates to the main branch. Eventually, that final merge becomes difficult or even impossible.
- An effective strategy for combating this is to periodically merge the main trunk into the branch
- the reverse of the “normal” merge direction

This approach changes our basic rules a bit.
- Start every work session with a
git pull.- Unless you have really good reasons not to,
git mergeany changes in the main branch into your working branch.
- Unless you have really good reasons not to,
- Do your work.
- End every work session with a
git commitand agit push. - Merge the main branch into yours frequently.
- When you are ready to merge your branch back into the main branch, merge the main branch into yours first so that any conflicts can be resolved before inflicting them on your teammates.
4 git on your own PC
Our focus has been on local repositories residing in your CS Linux account area, because that’s were we have been learning to edit and compile code.
But many students like to install compilers on their own PCs and do a lot of their work there. You can install git in Windows and macOS to manage repositories on your own PC.
You can even use them as a way to hop back and forth, doing the bulk of your work on your own PC, then checking out a copy in your CS Linux account area for final testing. But hopping back and forth like that is pretty much like being in a team project with yourself, and will require an understanding of branches.
Installing git on your own PC is not difficult.
-
Windows: Look at where you do your local development work.
-
If you work in the Windows Subsystem for Linux (WSL), you can install
gitin the WSL like this:sudo apt-get update sudo apt-get install git -
If you work in CygWin, rerun the CygWin installer and select
gitfrom the list of installable packages. -
If you work in “native” Windows using Eclipse, Eclipse has
gitbuilt in, with most of the functions available throught the “Team” menu when you right-click on a project. -
You can install a command-line
gitvia these instructions.
-
-
MacOs: If you have installed compilers such as the
g++compiler via the XCode Command Line tools, you probably already havegit.Otherwise, see these instructions.
-
Linux: See these instructions.
4.1 Working on more than one machine.
I often work on projects using more than one PC. I may do some work on my office PC and other work on my home PC. I might do some of my work by remote development on the CS Dept.’s Linux servers, and some of it on my local PC.
git makes it easy to keep all of these copies in sync with one another. I simply create a local repository on each machine where I work, all sharing the same origin repository on GitHub or on the CS Dept.’s GitLab.
Then I simply act like I am on a team, where all of the team members happen to be me. I follow the same discipline that I would when on a team:
- Start every work session with a
git pull. - Do your work.
- End every work session with a
git commitandgit push.