


Continuous Integration
Steven J Zeil
Abstract
In continuous integration, the practices of version control, automated building, automated configuration, and automated testing are combined so that, as changes are checked in to the version control repository, the system is automatically rebuilt, tested, reports generated, and the results posted to a project website.
1 Big Builds
Think of everything we have started to put into our automated builds:
- fetching and setup of 3rd party libraries
- static analysis
- compilation
- unit testing
- documentation generation
- static analysis reports
- packaging of artifacts
- deployment/publication of artifacts
- updating of project website
and, coming up, we will want to expand our testing to include
- integration testing
- test coverage reporting
- system testing
There’s a danger of the builds becoming so unwieldy and slow that programmers will start to look for ways to circumvent steps,
Do We Need to do All of Those Steps, All of the Time?
One possible breakdown:
| Every build | Occasional |
|---|---|
| fetching and setup of 3rd party libraries | documentation generation |
| static analysis | static analysis reports |
| compilation | deployment/publication of artifacts |
| unit testing | updating of project website |
| packaging of artifacts | integration testing |
| test coverage reporting | |
| system testing |
This should provide someone actively working on a specific module/story the info they need, deferring some of the more time-consuming build activities.
How do we divide these steps in the build?
-
Even the “occasional” activities may be done many times over the history of a project.
-
So we want to keep them automated, both for ease of performing them and to ensure they are performed consistently each time.
-
With
make/ant/maven/gradle, we can have different targets/goals for the frequent and the occasional cases.- But we have to remember to use the proper targets at the right time.
- Maybe not a big deal…
- But we have to remember to use the proper targets at the right time.
-
But there’s an opportunity here to do something much more interesting…
2 Continuous Integration
When we combine
- Automated testing (unit, integration, system, and regression)
- Centralized version control
- or distributed VC with a central “official” repository
- Automated builds, capable of running tests, running analysis tools, and publishing the results on a project web site
we can rebuild and retest automatically as developers check in changes.
2.1 Key Ideas
Our project should have the characteristics:
-
Version control with a clearly identified main branch or set of main development branches.
-
Automated build is set up as usual.
-
Developers commit frequently (maybe many times per day)
- Commits to “private” branches (or local copies of a distributed repository) are ignored.
- Every commit of a tracked branch to the main repository is built on a separate server
- The build includes all integration-related tasks (for early detection of integration problems.
- Can also include more time-consuming reporting tasks.
-
Testing is done, ideally, in a clone of the production environment(s)
- May differ from development environments
- Probably not checked frequently under normal practice
- Can use multiple remote machine “runners” to provide varying target operating systems and environments.
-
Make the results highly visible
2.1.1 Advantages
- Integration problems caught early and fixed fast
- Immediate testing of all changes
- Emphasis on frequent check-ins encourages modularity
- Visible code quality metrics motivate developers.
2.1.2 Disadvantages
- Initial setup effort to set up
- Level of sophistication required of team to put build, configuration mgmt., testing, reporting, into an automated build
2.2 Continuous Integration Systems
A CI system consists of a server/manager and one or more runners…
2.2.1 The Continuous Integration Server
A continuous integration server is a network-accessible machine that
-
Can be told of development projects under way, including
- location & access info to version control (VC) repository
- which branch(es) to watch
- how to build the project
- what reports are produced by the build
-
Monitors, in some fashion, the VC repository for commits
-
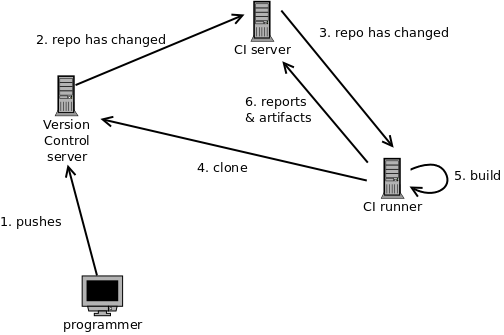
When a commit (to a monitored branch) takes place, the CI server notifies one or more runners.
2.2.2 Continuous Integration Runners
A CI runner (a.k.a., nodes) is a process on a machine that
-
has the the necessary compilers and other tools for building a project.
-
is managed by the CI server.
When notified by the server, the runner
-
Clones a designated branch of a project from its version control system.
-
Runs the build.
-
Publishes reports on the results of the build(s).
- It may also ship “artifacts”, constructed files being made available for download.
- Examples would be the latest version of a library or an executable.
- It may also ship “artifacts”, constructed files being made available for download.
-
Runners are usually separate machines from the CI server.
-
A CI project may launch several different runners, each with a different configuration environment (e.g., different operating systems) to test the build under multiple configurations.
3 Case study: GitHub Actions
GitHub provides an integrated CI service called “Actions”.
- “Actions” on the main project page shows recent runs from commits.
-
Click on links with green checkmarks and red X’s to see successful and failed builds.
Then click on “Build” to see the details.
-
3.1 GitHub Actions setup
-
In the root directory of your project, create a
.github/workflows/directory. -
Create a file with a
.ymlextension in that directory describing your desired CI actions.This will have a mixture of metadata describing how you want this run and
runblocks containing scripted commands. -
Commit and push.
An example of .github/workflows/gradle.yml
# This workflow will build a Java project with Gradle

name: CI - build and test

on:
  push:
    branches: [ main, CI-setup ]

jobs:
  build:

    runs-on: ubuntu-latest

    steps:
      ⋮
name:Pick any name you like. these will appear in the log of the actions performed.on:Describes the circumstances under which this CI script is activated.push:indicates that we want to perform these action when commits are pushed to selected branches.branches:A list ([ ]) of branch names on pushes will cause this to be run. Often this will only occur on pushes tomain, butCI-setupwas the branch I used to test out this CI script.
jobs:You can have one or more of these. Jobs are run in parallel (if runners are available to do so). By default, they do not share any information, although that can be changed.build:“build” is the name I chose to give my job. It’s components are:-
runs-on:This describes the runner I want to use.In this case, I have opted for a GitHub-supplied runner, one that provides the latest version of Ubuntu Linux.
-
steps:the scripted steps that I actually want performed.We’ll look at these in detail next.
-
3.1.1 The steps dissected
Now let’s look at the steps:
      ⋮
    steps:
    - uses: actions/checkout@v4                   ➀
      with:
        fetch-depth: 0
    - name: Set up JDK 11                         ➁
      uses: actions/setup-java@v2
      with:
        java-version: '11'
        distribution: 'adopt'
    - name: Grant execute permission for gradlew  ➂
      run: chmod +x gradlew
    - name: Build and test the plugin             ➃
      working-directory: ./cowem-plugin
      timeout-minutes: 20
      run: ../gradlew build
Each step is introduced by the leading hyphen (‘-’).
The components of a step that you can see are:
uses:invokes a predefined GitHub action.with:parameters to the preceding action.name:as before, allows us to add a descriptive name that will appear in the action log.working-directory:changes the working directory (relative to the project root) in which the step takes place.timeout-minutes:Sets a time limit (useful if you are worried about tests going into infintie loops)run:introduces a shell command to be executed on the runner. Multiple commands can be written by placing a ‘|’ after the “run:” and then writing multiple indented commands, one per line, after that.
With that understanding, here’s what’s happening:
-
➀ Almost every job will start with this. It is a predefined action that causes your repository to be cloned into the working area and set to the appropriate branch.
The
fetch-depthparameter causes all remote branches to be tracked in the new repository instead of just the main branch. That’s not always necessary, but would be useful when combining this with the branch-based Github mechanism for deploying reports to a Github website. (We would still need to usegitcommands to create a local branch tracking the remote one, but this makes sure that the remote one is available.) -
➁ Sets up the Java 11 compiler on the Ubuntu Linux runner.
-
➂ A bit of insurance. If you or any of your teammates are working in Windows, there’s a good change that the executable permission will not be set on the
gradlewscript. So we make sure thatgradlewis executable. -
➃ Because this project has subprojects within the project root directory, we set the working directory to one of the subprojects and then run Gradle.
3.1.2 GitHub Actions and GitHub Pages
In an earlier lesson, we saw that GitHub uses a potentially complicated series of git actions to publish web content in a separate repository branch (usually, gh-pages).
Not surprisingly, they’ve packaged this up into a pre-defined action that can be invoked in the steps instructions:
- name: Deploy
        uses: JamesIves/github-pages-deploy-action@v4.3.4  ➀
        with:
          branch: gh-pages                                 ➁
          folder: build/reports                            ➂
- ➀ The name of the deployment action.
- ➁ The branch being used to hold the website.
- ➂ The directory containing the website content that you want to deploy.
Run this after the steps in which you build your project (including the website content).
You can find an example of a project using this technique here.
3.2 Supplying Secrets to Github Actions
Sometimes an automated build will require secret or private information such as passwords or SSH private keys.
When running such a build from the command line, we can prompt the user or acquire such secret information in other ways, such as via an SSH key agent.
That won’t work during continuous integration, because the programmer is not present to supply the secret information. And, obviously, if this information is supposed to be kept private, the last thing we want to do is to code it into a file that we commit to our repository, where it becomes part of the historical record of the project for all time.
So Github provides a mechanism for providing secret information that can be used in CI scripts but not viewed by anyone afterwards.
For example, in one of our website deployment case studies, we developed Gradle tasks that cloned a GitHub repository. That would likely work if you ran it from the command line, because presumably you would already have an SSH key set up to give you access to GitHub. But it won’t work when dropped into a CI script, because the CI runner will not already have those credentials.
The secrets are added from the Secrets tab of a Github repository’s Settings page. Click the New repository secret button to add one.
For example, suppose we wanted to provide an SSH key that could be used from within an action.
- Create a new SSH key pair. Make this one passphrase-free, as possession of the private key is going to be restricted to this single use.
- Add the public half of the key to your (or some other team member’s) GitHub account.
- Go to your repository’s Settings page on Github. Select the
Secretstab and click theNew repository secretbutton. - Give this secret a name, for example,
REPORTS_SSH_KEY. Paste the text of the private key into the “Value” box and clickAdd secret..
You can now use that name like a variable in your Github actions via the rather arcane syntax:
${{ secrets.secret-name }}
For example, to set up an SSH agent that can supply that key, you could add this to your CI script:
- name: Deploy reports using an SSH agent
      run: |
        eval $(ssh-agent -s -t 600)                           ➀
        ssh-add <(echo "${{ secrets.REPORTS_SSH_KEY }}")      ➁
        git config --global user.email "you@email.address"      ➂
        git config --global user.name "Project Actions"
        ./gradlew deployWebsite                               ➃
-
➀ This line launches an ssh key agent.
The -t 600 option limits this agent to a maximum of 600 seconds before it stops offering the key.
-
➁ We know the ssh-add command as a way to add private ssh keys to the agent.
In this case, the text of the (passphrase-free) private key is being supplied by Github as a secret project variable REPORTS_SSH_KEY.
-
➂
gitwill insist on these user properties being set before it will permit commits. -
➃ The actual commands, whatever they might be, that make use fo the SSH agent must occur within the same
run:block, because the environment variables, created byssh-agent, used to access the SSH agent will not persist after the end of that set of instructions.
Any later steps in the CI script will now be able to access the Github account to which the public half of that key is registered.
You can find an example of a project using this technique here.
4 Hosting a GitHub Actions Runner
If the GitHub-supplied runners are unsuitable, you can provide your own, e.g., on AWS. GitHub refers to this as “self-hosting”.
There are several steps involved, with lots of details, but not overly complicated.
- You install the runner application on your own machine and use your GitHub project settings to add that self-hosted runner to the project/repository.
- On your hosting machine, either start the runner application manually or configure the machine to run the application automatically on startup.
- Instead of saying that your CI scripts
runs-ona GitHub machine, you specify one or more of the descriptive labels for your runner application.
5 Related ideas
-
Continuous deployment publishes snapshots of deliverables as changes are checked in.
- A variation of the rather common “daily build” practice seen on many projects.
- Some Maven repositories (including our own Artifactory instance) provide separate “snapshot” repositories for this purpose.
- We have not discussed publishing to repositories, although this is well supported within Gradle.
-
Some organizations actually wire up build light indicators to provide a highly visible indicator of the status of the latest integration build.
- Some then point a webcam at the light and broadcast their status.
- Others opt for publishing a software analog of such lights on their project website.