


Deploying Websites
Steven J Zeil
Abstract
We’ve looked at how to use automated tools to generate project websites.
In this lesson we will look at how to get those deployed to a web server.
Suppose that we have a project that looks like this:
projectRoot/
|-- .git/
|   |--  ⋮ git's internal storage - do not touch!
|-- gradle/
|   |-- ⋮ gradle wrapper files
|-- gradlew
|-- README.md
|-- settings.gradle
|-- .gitignore
|-- project/
|   |-- .gitignore
|   |-- build.gradle
|   |-- src/
|   |   |-- main/
|   |   |   |-- java/
|   |   |   |   |-- ⋮
|   |   |   |-- html/
|   |   |   |   |-- index.html
|   |   |   |   |-- ⋮  other static content for website
|   |   |-- test/
|   |   |   |-- java/
|   |   |   |   |-- ⋮
|   |   build/
|   |   |-- classes/
|   |   |   |-- ⋮
|   |   |-- libs/
|   |   |   |-- ⋮
|   |   |-- reports/
|   |   |   |-- ⋮
Assume that we have already added a buildSite target to our build.gradle file that constructs our desired website in build/reports/.
How do we put that website onto a web server for the world to enjoy?
1 Deploying Websites Via SSH
In many cases, we have SSH/SFTP access to a web server, which is configured so that files and directories copied into a certain location will be served and mapped onto URLs. For example, on the CS Linux network, files stored in /home/yourName/secure_html/whatever are served at the URLs https://www.cs.odu.edu/~yourName/whatever.
So, if I wanted to manually update the file served at https://www.cs.odu.edu/~zeil/officehours/index.html, I could
-
Get a local copy of the file,
scp zeil@linux.cs.odu.edu:/home/zeil/secure_html/officehours/index.html .or
wget https://www.cs.odu.edu/~zeil/officehours/index.html -
Edit the file.
- Upload the edited file to the server:
scp index.html zeil@linux.cs.odu.edu:/home/zeil/secure_html/officehours/
That’s fine for working with one file or two. But if I have a website with many files (e.g., this course website) and I have updated several of them, I’d rather not risk forgetting to upload one or two of the changed files. Most command-line versions of scp have an option for recursive copy of directories, e.g.,
scp -r cs350/website/* zeil@linux.cs.odu.edu:/home/zeil/secure_html/cs350/
But a better choice, in many cases is rsync. rsync is a program specifically designed for copying large directory trees in circumstances where only selected files are likely to have changed.
When rsync is given a source directory and a destination directory, it computes a hash function for each file and, for large files, for portions of those files. If the hashes match, those files (or blocks of large files) are presumed to be identical. rsync then proceeds to transfer only the files that have been changed. So, if I have rsync available, I am much more likely to do
rsync -auzv -e ssh cs350/website/ zeil@linux.cs.odu.edu:/home/zeil/secure_html/cs350/
The “-e ssh” part of that command tells rsync to do its communications with the remote machine via SSH, the default being an rsync-specific protocol that requires a dedicated rsync server to be running on the remote machine.
The biggest limitation to using rsync is that it is not available on all machines. It can be easily installed on Linux and MacOS machines. Native Windows ports of it have been, in my opinion, unreliable. It can best be run in the Windows Subsystem for Linux (WSL) or the CygWin Unix emulator, but that introduces the complication of mapping paths between the Unix and Windows file systems.
1.1 Deploying via SSH
The gradle plugin org.hidetake:gradle-ssh-plugin allows you to
- Use
scpto upload or download one file at a time from/to a remote server. - Use
sshto issue commands to a remote server.
A plausible set of Gradle steps:
- Create a
.zipfile of the entire constructed website - Use
scpto upload the zip file to the remote server. - Use
sshto issue anunzipcommand on the remote server. - If necessary, use
sshto issuechmodcommands as necessary on the unzipped content.
build.gradle
plugins {
  id 'org.hidetake.ssh' version '2.11.2'
}

task zipWebsite (type: Zip, dependsOn: 'buildSite') {   ➀
    archiveFileName = 'website.zip'
    destinationDirectory = file('build')
    from 'build/reports'
}

remotes {
  webServer {
    host = IP address
    user = userName
    identity = file(path-to-ssh-private-key)  ➁
  }
}

task deploy (dependsOn: 'zipWebsite') {
  doLast {
    ssh.run {
      session(remotes.webServer) {
       put from: 'build/website.zip', into: 'websitePath' ➂
       execute 'unzip websitePath/website.zip' -d websitePath➃
      }
    }
  }
}
- ➀ Zip up the website. remember, we have assumed that the website is constructed in
build/reportsby abuildSitetask. - ➁ We will assume that we have added this key to a running key agent, so that we will not get prompted for a passphrase.
- ➂ Copy the zip file to the remote host.
- ➃ Tell the remote host to unpack the zip file.
1.2 Deploying via rsync
The Java library rsync4j-all provides a Java interface to rsync:
- On Linux/MacOS machines, assumes that a native
rsynccommand is present. - On Windows machines, provides a minimal version of the CygWin environment with
sshandrsyncexecutables.
build.gradle
buildscript {       ➀
    repositories {
        mavenCentral()
        maven {
            url "https://plugins.gradle.org/m2/"
        }

    dependencies {
        ⋮
        classpath "com.github.fracpete:rsync4j-all:3.1.2-15"
    }
}

import com.github.fracpete.rsync4j.RSync;  ➁
import com.github.fracpete.processoutput4j.output.ConsoleOutputProcessOutput;

task deployWebsite (dependsOn: "buildSite") {
    doLast {
        def sourceDir = "build/reports/";
        def userName = System.properties['user.name']  ➂
        def serverName = "linux.cs.odu.edu"
        def destinationDir = "secure_html/gitlab/cCCdemo/"
        def destURL = "${userName}@${serverName}:${destinationDir}"; ➃
        RSync rsync = new RSync()
                .source(sourceDir)
                .destination(destURL)
                .recursive(true)
                .archive(true)
                .delete(true)
                .verbose(true)
                .rsh("ssh");  ➄
        ConsoleOutputProcessOutput output
                = new ConsoleOutputProcessOutput();
        output.monitor(rsync.builder());
    }
}
- ➀ This is gradle’s “old” style for loading plugins and libraries that need to be accessible to the build.gradle script. The new style, using the
pluginssection, only works for plugins but not for loading Java libraries. - ➁ The
rSync4jlibrary, loaded in the dependencies section above, is not a plugin. It’s just a library. But we can use Java libraries in Gradle (Groovy) pretty much like we use them in Java. - ➂ This line and the next 2 give the components you need to make an SSH connection: the name of the user account to use (assumed here to be the same as the person running the build), the server to use, and the destination directory for the upload.
- ➃ This builds the actual SSH URL. It uses a technique called “string interpolation”, common in many scripting language, for embedding variable values directly into a string.
- ➄
rsyncwill connect usingssh. This assumes that the person running the script has a suitable ssh key in a running key agent.
1.3 Potential Issue - the CS VPN
These techniques would work very well for posting project reports to a CS webserver, provided that the build process is running from inside the CS VPN.
-
Right now, that’s not a problem.
-
But in upcoming lessons, we will be looking at off-loading this task onto a “continuous integration runner”, and our runners are going to be on the wrong side of the VPN.
2 GitHub Pages
GitHub provides a web server (called GitHub Pages) for projects hosted on it. A project hosted at https://github.com/owner/project will have web pages hosted at https://owner.github.io/project/.
But GitHub has adopted an unusual, git-centric, approach to deployment.
When you activate GitHub Pages for your project, you specify a specific git branch to manage your website content.
- By default, this branch is named
gh-pages.
For example,
- I have a page at https://sjzeil.github.io/CoWeM/userReference/Directory/outline/index.html.
- That means that, in my project repository, I have a file in my
gh-pagesbranch atuserReference/Directory/outline/index.html(relative to the root of my project). - Now, the
mainbranch of my project looks something like the directory structure at the beginning of this lesson.- For example, my project root directory has a
README.mdfile, asettings.gradleand a project directory that, in turn, holds mysrc/directory.
- For example, my project root directory has a
- But you won’t find any of that in the
gh-pagesbranch.
The makes the gh-pages branch different from other examples of branching that we have looked at. Normally, the different branches of a repository contain directory structures that are quite similar to one another. A gh-pages branch, however, does not mirror the structure of the main or other branches at all. It’s just a separate storage area for the website content.
2.1 Setting up the gh-pages branch
To get started, we need to
- Create a new
gh-pagesbranch. - Remove everything from it except the
.git/directory (which holds thegitinternal information) and, maybe, the README. - Commit those changes.
- Push to the remote repository, establishing the
gh-pagesbranch on there.
This can lead to a moment of panic when we look at our project and see that everything is now gone. But, of course, we only need to check out the main branch to get everything back.
Don’t try to do these steps from inside an IDE. * In fact, make sure that you have closed this project in your IDE so that it can’t see any of this. * Otherwise your IDE’s Java/gradle project settings will seem to have disappeared, and your IDE will get terribly confused.
2.2 Deploying the gh-pages branch
How would we deploy a website that we have built in, say, build/reports?
It’s tempting to start off with:
- Check out the
gh-pagesbranch.
But, oops! The build/reports directory might not survive that. Certainly our build.gradle file will not. They don’t exist in the gh-pages branch. And, if I had any changed files that I had not yet committed, I won’t nbe allowed to switch branches anyway.
So, I’m inclined instead to leave my main branch files in place, and construct the gh-pages files in a separate location. One way to do that would be to make a separate clone for this purpose. But that requires extra interactions with the remote origin, and we might want to keep those to a minimum, particularly later when we move this step off-line.
Though it’s somewhat unusual, git allows us to have more than one working tree (a local collection of editable files) per repository. We’ll take advantage of that capability:
- Check out a copy of the
gh-pagesbranch into a separate working tree location.- I would prefer to do this somewhere in the project’s
build/directory, so that it gets deleted whenever we clean the project by deletingbuild/, but my experience is that it’s a bad idea to keep the extra working tree inside the original working tree. - So I will put this “alongside” my project’s working tree at
../website-temp.
- I would prefer to do this somewhere in the project’s
- Copy all files making up my website into
../website-temp.- Exactly what files those are will depend on how I am building my website.
- If we have followed this case study, all of the files will be in
build/reports. - If we have followed this case study, all of the files will be in
build/jbake. - Or we may not have done either of those, in which case the website content may be spread among several different locations.
- If we have followed this case study, all of the files will be in
- Exactly what files those are will depend on how I am building my website.
- Commit those changes in
../website-temp(to thegh-pagesbranch). - Push the changes.
- Delete everything in
../website-temp.
I will generally try to have conveniently named gradle tasks for, at least, steps 2, 4, & 5 so that I can readily debug the process.
- After step 2, I should be able to view an image of the entire website in the
website-tempdirectory. If things are not correct, I have not yet updated anything in my repository. - After step 4, I should be able to check that copy against the
gh-pagesbranch in the remote repository.- By the end of step 5, that local copy will no longer be available.
2.2.1 The git commands
Before trying to do this in gradle, let’s look at what we would do to accomplish these steps if we were working directly at the command line.
-
From the normal project, root, set up the new working tree.
rm -f ../website-temp
mkdir ../website-temp
git worktree add -f ../website-temp gh-pages
git checkout gh-pages
git pull
The first git command in this series is the git command to create a second working tree, located at
../website-temp, containing a copy of thegh-pagesbranch.The
checkoutcommand makes sure that we have the top (HEAD) commit.Finally, we pull just in case changes have been made to the branch on the remote repository.
-
Copy all files making up the website into
../website-temp/.For the sake of this example, I will assume that all of the files that we need are in
build/reports.cp -rf build/reports/* ../website-temp -
Commit and push those changes to the
gh-pagesbranch.cd ../website-temp git add . git commit -m "Updating website" git push -
Push the new clone.
git push -
Clean up.
cd ..
rm -rf website-temp
git worktree prune
The
prunecommand cleans up the internalgitrecord of what worktrees you still have in place.
2.3 Deploying to gh-pages from gradle
To automate this process in gradle, we need a mixture of file manipulation commands and git commands.
gradle already provides functions for file manipulation. What about the git commands?
There are gradle plugins for working with git. But I find them more than a little tedious to work with. If we know that the only machines that we will be running on will have a native version of git, it’s easier to use the gradle exec command, which can run a native OS command in a specified working directory.
This can be done in two ways:
-
As an
Exectype task, e.g.,task gstatus (type: Exec) { workingDir = '.' commandLine = ['git', 'status'] } -
Or as an
execfunction call within a task’sdoLastlist:task gstatus2 () { doLast { println "Check out repository status" exec { workingDir = '.' commandLine = ['git', 'status'] } } }
Either way, the relevant parameters are
workingDir- The directory to “cd” into before issuing the command.
commandLine- The command to issue, written as an array of strings.
ignoreExitValue- Optional, if set to
true, the gradle build continues even if the command fails.For example, a
git commitcommand will “fail” if none of the files have changed, but we probably would not want to stop our build just because the website content is unchanged.
2.3.1 From git to gradle
1. Check out a copy of the gh-pages branch into a separate working tree location.
////////  Website publication on GitHub pages ///////////////////

def pagesDir = file("${project.rootDir}/../website-temp").absolutePath

task clearPages(type: Delete) {
    delete pagesDir
}

task workTree(dependsOn: ['clearPages']) {
    doLast {
        exec {
            workingDir = '.'
            commandLine = ['git', 'worktree', 'add', '-f', pagesDir, 'gh-pages']
        }
        exec {
            workingDir = pagesDir
            commandLine = ['git', 'checkout', 'gh-pages']
        }
        exec {
            workingDir = pagesDir
            commandLine = ['git', 'pull']
        }
    }
}
The def pagesDir allows us to easily change where we are putting the new working tree.
2. Copy all files making up my website into the new working tree.
task copyReports (type: Copy, dependsOn: ['reports', 'workTree']) {
    from 'build/reports'
    into pagesDir
}


task copyWebsite (dependsOn: ['copyReports']) {
}
Again, for the sake of example, I am assuming that all of the files we need are in build/reports. I will further assume that we have already created a task named reports to guarantee that all desired reports have already been run.
- If we have additional files in other locations, we can add tasks to copy those nad simply make
copyWebsitedepend o nthose other copy tasks in addition tocopyReports. - Note that
copyReportsdepends on bothreportsand on our newworkTreetask.
3.Commit those changes to the gh-pages branch.
task commitWebsite (dependsOn: 'copyWebsite') {
    doLast {
        Date now = new Date()

        exec {
            workingDir = pagesDir
            commandLine = ['git', 'add', pagesDir]
            ignoreExitValue = true
        }
        exec {
            workingDir = pagesDir
            commandLine = ['git', 'commit', '-m', 'Updating webpages at ' + now.toString()]
            ignoreExitValue = true
        }
    }
}
4. Push the changes to the gh-pages branch.
task pushWebsite (type: Exec, dependsOn: 'commitWebsite') {
    workingDir = pagesDir
    commandLine = ['git', 'push']
    ignoreExitValue = true
}
5. Clean up
task deployReports (type: Delete, dependsOn: 'pushWebsite') {
    group = "Reporting"
    description  'Commit and push website changes to GitHub'
    delete pagesDir
    exec {
            commandLine = ['git', 'worktree', 'prune']
            ignoreExitValue = true
        }
}
2.3.2 gitPublish
But carrying out all of those steps can still be quite unwieldy. Luckily, there’s a git-publish plugin available:
plugins {
    ⋮
    id 'org.ajoberstar.git-publish' version '4.2.0'        ➀
}

⋮

////  Publication of website to GitHub

gitPublishCopy.dependsOn site                                  ➁
gitPublish {
    // the repository
    repoUri = 'git@github.com:yourProject.git'

    // branch in which to publish
    branch = 'gh-pages'

    // what to publish
    contents {
        from 'build/reports'                                   ➂
    }

}
-
➀ This loads the plugin.
This plugin provides a series of targets:
gitPublishResetsets up the working directory with a clone of the gh-pages branch.gitPublishCopycopies the files comprising your website into that clonegitPublishCommitcommits changes to thegh-pagesbranchgitPublishPushpushes those committed changes to the remote repository on GitHub.
If your website deployment isn’t working, running these tasks one at a time may aid in debugging.
gradle gitPublishPushshould send our updated website to GitHub. -
➁ This assumes that we can generate our website by doing
gradlew siteThis dependency makes sure that the site content has been created before we try to copy the site to our local copy of the
gh-pagesbranch. -
➂ This is a “copy spec” indicating the name of the directory containing our site content.
Warning: Several teams have encountered problems with the gitPublish plugin (as of Spring 2024) resulting in intermittent failures of the gitPublishReset task.
2.4 GitHub Actions has a ShortCut.
In an upcoming lesson, we will see that GitHub has packaged up a simple means to execute the equivalent of the above steps, but only when running your build on a server provided by GitHub.
2.5 Deploying to Github Pages Using Free Accounts
If you are working with a private repository from a free account, then Github pages will not be available to you.
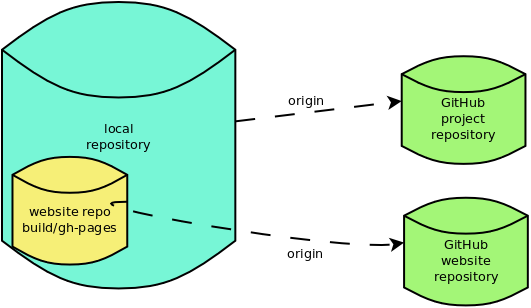
A workaround is to create a second, public, repository whose only purpose is to host the website. Because this second repository will not have anything in it but the web content (which was always going to be public anyway), there’s no great loss of security in making this second repository public.
The second repository can also be simpler. It doesn’t need multiple branches to separate the project code from the website, because no project code will be stored there. So we can tell Github to use the main branch as the source of the website.
2.5.1 The Steps Required
You have two GitHub repositories: a private “main” repository with your code and a public “website” repository.
Within your main project build:
- Use
gitto clone your website repository into a convenient location, e.g.,build/gh-pages. - Copy your constructed website (e.g.,
build/jbake) to the website clone inbuild/gh-pages/ - Commit and push the changes to the website clone.
2.5.2 The Gradle Tasks
Here I use the Gradle exec function to run the appropriate git commands.
exec takes two main parameters:
workingDir: the directory within which to issue the command.commandLine: the command to run, presented as a list[ ]of strings.
////////  Website publication on GitHub pages ///////////////////


def websiteRepo='git@github.com:sjzeil/pages-sandbox.git'    ➀

task clearPages(type: Delete) {
    delete 'build/gh-pages'
}

task clonePages(dependsOn: ['clearPages']) {                ➁
    doLast {
        exec {
            workingDir = '.'
            commandLine = ['git', 'clone', websiteRepo, 'build/gh-pages']
        }
    }
}


task copyWebsite (dependsOn: ['reports', 'clonePages']) {   ➂
    doLast {
        ant.copy (todir: 'build/gh-pages') {
            fileset(dir: 'build/jbake')
        }
    }
}


task updateGHPages (dependsOn: 'copyWebsite') {
    group = "Reporting"
    description  'Copies reports to the website repo and pushes to GitHub'
    doLast {
        def pagesDir = "$buildDir/gh-pages"
        exec {
            workingDir = 'build/gh-pages'                                ➃
            commandLine = ['git', 'add', '.']
        }
        exec {
            workingDir = 'build/gh-pages'
            commandLine = ['git', 'commit', '-m', 'Updating-webpages']   ➄
        }
        exec {
            workingDir = 'build/gh-pages'
            commandLine = ['git', 'push']
        }
    }
}
- ➀ Here we provide the
gitURL to clone the second repository.- Obviously, this will depend on your project.
- ➁ We clone the website repository, putting the within our
build/directory. - ➂ We copy the web content into the cloned area.
- This could probably also be done as a Gradle
Copytask.
- This could probably also be done as a Gradle
- ➃ We tell
gitto stage all of the files we have copied. - ➄ Finally, we commit and then push.
3 Jekyll and Github Pages
In this case study, we looked at the use of a static website generator (JBake) to reformat our website content before sending it to our web server. This results in a lighter-weight build process, though you lose the ability to preview the website from your local copy before uploading it.
GitHub Pages features a similar generator, called Jekyll, that will reformat website contents after it has been pushed to GitHub Pages.
Jekyll on GitHub Pages will convert Markdown (.md) pages to reformatted HTML, but does not affect pages already in HTML.
There are a number of supported themes that offer a variety of look-and-feel options. However, these themes are not particularly consistent in terms of what modifications you can make and how you go about doing so.
I wll give an example of the use of the minimal theme, a theme that features a two-column layout with the primary page content on the right and site info and navigation links in the left. You can see an example of that there here.
3.1 _config.yml
Jekyll themes are selected and basic information supplied via a file _config.yml, which must eventually wind up in the root directory of the website. For that purpose, I create a file by that name in my project in src/main/html/ and make sure that everything in that directory gets copied to my website directory when deploying.
Here is an example:
remote_theme: pages-themes/minimal@v0.2.0
plugins:
- jekyll-remote-theme
title: "My CI SandBox"
description: "A project devoted to exploring CI and web deployment options."
logo: https://ww1.odu.edu/facultystaff/communication/toolkit/current-logos/_jcr_content/par/section_1593932067/columns/column_0/section/image.img.440.jpg/1594322669659.jpg
show_downloads: false
The top three lines load the “minimal” theme. The remaining lines supply info about how to apply the theme.
3.2 Content
Content is supplied as Markdown files. The “landing” or “home” page of most sites is index.html, which in this case is generated from a file index.md which I also place in src/main/html:
index.md
---
title: CI-Sandbox by SJZ
---

This is a sandbox area for playing around with GitHub Actions
and GitHub Pages.

* [README](README.html)
README.md
---
---
# CI-sandbox
for playing around with GitHub Actions

* [Reports](https://sjzeil.github.io/CI-sandbox/)
3.3 Navigation
To add navigation links to the left column, a little more work is necessary.
Layouts are controlled by templates similar to the ones we saw for Jbake. For Jekyll, these get stored in a _layouts directory. So, I
- Create a directory
src/main/html/_layouts - Download a copy of the
default.htmltemplate from the minimal style GitHub repo, placing it in that directory. - Edit that file, adding links at the bottom of the
<header>section:<p class="view"><a href="javadoc/index.html">Javadocs</a></p> <p class="view"><a href="tests/test/index.html">Unit Tests</a></p>The exact URLs in the links depend on my knowing where the reports will wind up following my
gradletasks for copying reports into the website.